Lego Robots with Java Brains
You can program the NXT brick using Java, using the "Eclipse" integrated environment. It is very convenient, especially if you have written programs before, but it is somewhat tricky to install all the pieces. Here are some quick instructions to help. I tried to include all steps, so please follow them carefully.
Step 1: Get the basic software
The first step is easy as the corresponding programs are packaged with convenient setup programs.
- Download and install the latest version of the Java Developer's kit JDK. Then double-click to install. Should work without problems but will take some time.
- Download and install a decent ZIP file manager. 7-Zip, for example, is excellent and free, so download and install 7-ZIP. You will need this utility program, because the Windows build-in utility does not handle long file names correctly.
Step 2: Download and unzip the Java tools
Create a folder "JavaNXT" (or similar) on your disk. This is where all your tools will go. Unfortunately the remaining tools do not come with setup programs, so we will have to do the setup manually. First, we simply download the software:
- Download the latest version of
Eclipse,
an integrated development environment.
- After downloading, right-click on the Eclipse ZIP file you downloaded, then pick "7-Zip | Open Archive ...". After 7-Zip opens, drag the folder into the JavaNXT folder created previously.
- Download the LeJOS program
lejos_NXJ_win32_0_6_0beta.zip, which includes a replacement for the NXT
firmware, Bluetooth module, and more.
- After downloading, right-click on the lejos_NXJ ZIP file you downloaded, then pick "7-Zip | Open Archive ...". After 7-Zip opens, drag the folder into the JavaNXT folder created previously..
- Download the icommand program icommand-0.7.zip,
which allows you to control your NXT through Java programs running on
your PC via Bluetooth.
- After downloading, right-click on the icommand ZIP file you downloaded, then pick "7-Zip | Open Archive ...". After 7-Zip opens, drag the folder into the JavaNXT folder created previously..
At this point you should have the JDK properly installed and configured and the rest of the software unzipped into folders:
c:\JavaNT\eclipse
c:\JavaNXT\lejos_nxj
c:\JavaNXT\icommand-07
Step 3: Installing the USB Filter
To connect to your NXT brick via a USB cable you will need the LEGO Mindstorms NXT software installed, as its USB drivers are used. You will also need the libusb filter driver for Microsoft Windows, which is included in the software you downloaded in step 2. On Vista you need to install it in "Windows XP compatibility mode" and "as administrator, on Win XP just install it:
- Open the folder: C:\JavaNXT\lejos_nxj\3rdparty\lib and look for the file libusb-win32-filter-bin-0.1.12.1.exe
- If you are using MS Vista:
- Right click on this file. Select "Properties | Compatibility", then click the "Run this program in compatibility mode" box and select "Windows XP (Service Pack2)" from the drop down list.
- Right click again, select "Run as Administrator", then follow the installation instructions.
- If you are using Windows XP:
- Just double-click on libusb-win32-filter-bin-0.1.12.1.exe and follow the instructions.
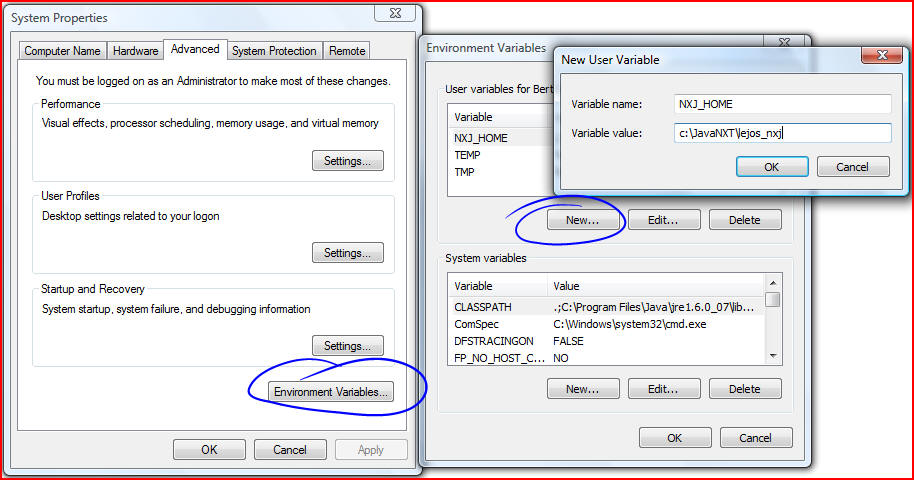
Step 4: Adding environmental variables
In order for LeJOS to find its parts you need to setup an environmental variable and adjust an existing one. It is perhaps the most technical step, so follow it carefully. The instructions and screen shots are for Windows Vista (it is similar if you are using Windows XP).
- Right-click on "My Computer" and select "Properties"
- Click on the "Advanced" category, then click "Environment Variables ..."
- Click on "New..." to add a new variable
- Enter "NXJ_HOME" as variable name and "c:\JavaNXT\lejos_nxj"
as value and click on OK to return to the 'Environment Variables" dialog
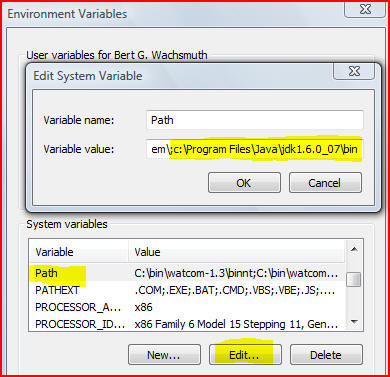
Finally you will need to edit a system variable named "PATH". The PATH variable tells the operating system which directories to search if an executable program needs to execute. We need to add the directory of the Java compiler to the path.
- In the "System Variables" list, find the one named "PATH" (or "path") and click on "Edit"
- Go the end of that variable value and append the following text to
the end. Do not erase the variable value, just add the
following at the end (perhaps use 'cut-and-paste' instead of typing).
Note that the leading semi-colon is part of what you have to add (unless
the current value already ends with a semi-colon in which case you don't
need an extra one). Add the following:
;c:\Program Files\Java\jdk1.6.0_07\bin
Step 5: Flushing the firmware on your NXT brick
To teach our NXT brick Java, we have to remove its operating system and replace it with a Java Virtual Machine (JVM). You can, in fact, do that many times, switch between the NXT firmware and other OS such as the JVM (which you can do about 100 times): it is called "flushing the firmware".
- Open up a Command Window by selecting "Start | Run" - type "cmd" and press OK
But first we will use this opportunity to check if step 4 worked properly:
- type "java -version" and hit enter. If you do not get an error message, the "path" variable is set correctly
- type "set NXJ_HOME" and hit enter. If you see the directory c:\JavaNXT\lejos_nxj, that variable is also set correctly
If you see any problems with these checks, close the command window and verify that you set everything correctly in step 4. Then return to step 5 to check again until there are no problems. Then you re ready to continue.
- Change into the right directory by typing "cd \JavaNXT\lejos_nxj\bin"
- Plug in your NXT with the USB cable and switch it on
- Switch your NXT brick into "firmware update mode" by pressing the reset button with a paper clip at the back of the NXT, inside the left-most hole of the upper left corner, for more than 4 seconds, then let go. Your NXT will tick quietly but audibly when it is firmware update mode and the screen will be blank.
- In the command window, type "nxjflash" and hit Enter
The nxjflash program will write the Java VM and the leJOS NXJ start-up menu to the flash memory of your NXT. When the procedure has finished, leJOS NXJ will start up and an empty menu will be displayed.
Note that you can switch the NXT off at any time, including when a program is running, by pressing the orange and dark gray buttons (ENTER + ESCAPE) together. To switch it back on just press the orange button.
If your NXT freezes at any time, remove and re-insert a battery (which will, unfortunately, happen occasionally, if you are using Bluetooth). Freezes happen particularly often if the battery level is low while using a Bluetooth connection, so keep your battery charged at all times.
Step 6: Configuring Eclipse
The (hopefully) last step is to configure Eclipse for convenient source code editing, compiling, and downloading.
- Create a shortcut to "eclipse.exe" in the Eclipse folder and put that on your desktop (or where ever you like to start your programs)
- Start Eclipse by double-clicking and accept the defaults (or adjust them to your liking).
- Click "Run | External Tools | External Tools Configuration"
- Select "Program" and click the "new" button
- Define three new entries, named "LeJOS Compile", "LeJOS Download", and "LeJOS Run" with the following parameters:
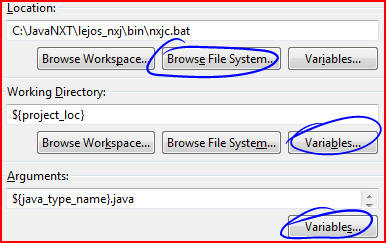
Parameters for "LeJOS Compile": Pick the
values in the boxes as above (make sure you are using "nxjc.bat") by
clicking on "Browse File System" and "Variables", respectively. Note that
you need to manually append ".java" (including the period) to the
"Arguments" after picking ${java_type_name} from "Variables...".
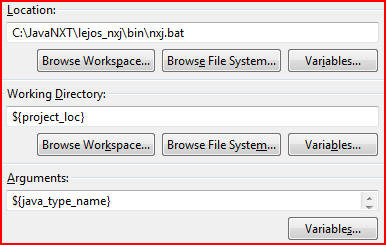
Parameters for "LeJOS Download": Pick
the values in the boxes as above (make sure you are using "nxj.bat") by
clicking on "Browse File System" and "Variables", respectively.
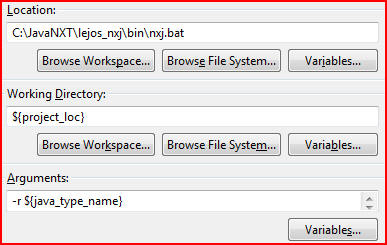
Parameters for "LeJOS Run": Pick the
values in the boxes as above (make sure you are using "nxj.bat") by clicking
on "Browse File System" and "Variables", respectively. Note that you need to
manually prepend "-r " (including the single space) to the "Arguments" after
picking ${java_type_name} from "Variables...".
As last step in the external tool configuration, select "Run | External Tools | Organize Favorites ...", click "Add" and check the three external tools you just created.
Finally, create a new Java project that will hold all of your NXT programs:
- Select "File | New | New Java Project ..."
- Enter "NXT" as project name and - important - make sure to select "Use project folder as root for sources and class files" under "Project Layout"
- Click "Next", then click on the "Library" tab
- Click on the "Add External JARs..." button and pick "c:\JavaNXT\lejos_nxj\lib\classes.jar"
- Click "Finish" (then close the decorative "Welcome" screen if necessary)
Now you re finally ready to create Java programs for your robot. See the lecture notes for details on Java programming for the NXT. For now, create your simple first Java program by clicking here.