Programming in Java
Home -> Teaching -> CSAS 3085/PSYC 3698 -> Building and Programming
Java is a computer programming language. As with every language, you must learn its grammar and vocabulary to use it effectively.
public class ProgramName
{
   // This is a one-line comment
	public static void main(String[] args) throws Exception
	{
         /*
            This is a multi-line comment
         */
   }
}
To help us generate programs, compile them, and download them to our NXT brick we will be using a widely known and handy utility program called Eclipse (known in the trade as an IDE – Integrated Developing Environment). It should already be installed on your laptop and configured for our purposes.
Here is a step-by-step guide to create a Java program for your NXT brick:
You should now see an empty program, or class, similar to the following (if your opening curly bracket is not on a line by itself, just edit your document accordingly):
public class Test2
{
}
This program, or class, is called “Test2” in this case and does – nothing at all. We need to add code that our robot can execute, and to ensure that our robot knows where to start, the first portion of code is always (almost) the same. Type very carefully and exactly the following lines in the right place, just as listed:
public class Test2
{
	public static void main(String args[]) throws Exception
	{
	}
}
If you make any mistake, like using the wrong kind of brackets, misspelling a word, changing the capitalization of a word, adding or forgetting anything, your program will not work and Eclipse will underline your error. You can right-click on the underlined error, just as in Word, but fixing your error is usually more complicated than picking the right word. It often works best to work in teams: one person types, the other carefully checks the typing for any errors.
Now our program is complete and contains one function called “main”, but it still does – nothing. To make the robot perform some action, you need to add code to the function called “main”. That code is the heart of your program, the rest is merely a framework that remains the same for most programs. For now, just add two lines exactly as follows:
public class Test2
{
	public static void main(String args[]) throws Exception
	{
		LCD.drawString("Yo, dude", 1, 1);
		Thread.sleep(3000);
	}
}
Compiling and Executing Our First Java Program
We have just created our first Java program- but actually it is just a typed-up document, much like a foreign-language paper written in Word. The technical term for this file is source code. We need to translate it into machine code and then transfer it to our “brick” before we can finally execute it.
1. Compiling the Source Code
This process translates the source code from the Java language to machine language (strings of 0’s and 1’s). With your cursor anywhere in the source code file, click the drop-down arrow in the “toolbox” icon in the button bar:
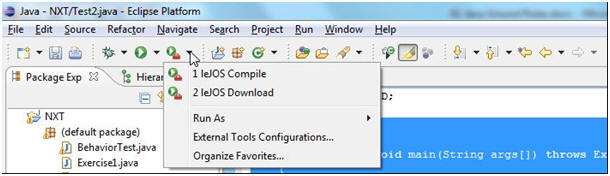
Pick on “leJOS Compile” item to translate the source code. You might be reminded to save your file (do so), but you should not see any problems or errors; in fact you should see very little: no news is good news.
2. Transferring the Program to the NXT
Once the program compiled, you need to transfer it to your brick:
You should see (and hear) confirmation that your program was downloaded properly. If you get an error, it is usually due to one of two facts:
3. Executing the Program
On your brick, maneuver to “Files” and press enter (the orange button). The program you just downloaded should be one of the choices. Select it and press enter. Then select “Execute” – your program finally runs.
Every time you change your source code you need to move through these steps again. Try it now!
Any robot built with the NXT brick includes many named components such as LCD, Sound, etc. Some have fixed properties; others must be initialized with various parameters. Programming the fixed components is easy: use them by name and call on their built-in functions. Here is an overview.
To use the LCD screen, you can use commands such as:
For more info about the LCD class, click here.
Many times you need a delay, or a timed break, in your program. For example, you might want to display some text for 2 seconds, then some additional text. Or you might want to engage the motor(s) for 3 seconds, then stop them. To do that you use the command
Remember that 1000 milliseconds are 1 second.
The brick contains four buttons: LEFT, RIGHT, ENTER and ESCAPE. Use the appropriate button name together with the command isPressed() or waitForPressAndRelease(), as in:
For more info about the Button class, click here.
You can program the robot to play some music, using the Sound component:
where freq is the frequency in hertz and duration is the length of the note in milliseconds. For more info about the Sound class, click here.
There are three motors, which can be connected to port A, B, or C. They can be referred to as Motor.A, Motor.B, or Motor.C, respectively. To control each motor use any of the following commands, as in: Motor.B.rotate(360):
forward() causes the motor to rotate forward indefinitely or until told to stop backward() causes the motor to rotate backwards indefinitely or until told to stop stop() stops a motor immediately flt() lets the motor coast to a stop setSpeed(speed) speed is in degrees per second, up to 900 is possible resetTachoCount() resets the motor’s tachometer to zero rotate(angle) rotates motor by angle degrees rotate(angle, returnImmediately) rotates motor by angle degrees but returns right away rotateTo(angle) rotates motor to specified degree isMoving() is the motor still moving? isRotating() is the motor still rotating?
For more info about the Motor class, click here.
Exercise 1: Write a program to display “Hello” on the brick’s LCD screen.
Exercise 2: Write a program to display “Hello” on the LCD while playing the first few notes of Beethoven’s 5th (E-E-E-C). You will need to know the frequencies of "C" and "E" - you can google them
Exercise 3. Write a program to display “Hello”, play some Beethoven, and drive forward some distance.
Exercise 4. Write a program to drive forward for exactly 2 seconds.
Exercise 5. Write a program to drive forward for exactly 1 meter.
Some components have fixed, or “static” properties. For example, the LCD screen exists exactly once and has a fixed number of rows and columns that can’t be modified. Other components – more flexible ones – can be created with different parameters. For example, a TouchSensor can be plugged in to any of 4 ports. Thus, before you can use it you need to specify which port it uses, i.e. you need to initialize it with a particular sensor port as input. The “new” keyword does exactly that: new creates a new instance of an object that is initialized with particular parameters
Example:
TouchSensor touch = new TouchSensor(SensorPort.S1);
From then on you can call on the touch sensor’s function by using the newly defined reference variable touch (not TouchSensor).
We will deal with sensors soon; for now we will introduce a very useful component called a “navigator”. A navigator models a differential drive robot with two independently controllable motors. It uses the rotational sensors (the tachometer) to keep track of each motor’s state, and through some elaborate – but thankfully hidden - math of the robot’s current position. To create a new navigator, you need to naturally provide the following information: the port each motor is connected to, the diameter of the wheels, and the axle length. Thus, to make for a new navigator with a wheel diameter of 8cm and an axle width of 16cm and motors connected to ports A (as left motor) and C (as right motor) you’d say:
SimpleNavigator robot = new SimpleNavigator(8.0f, 16.0f, Motor.A, Motor.C, true);
The last parameter is optional and indicates whether to run the motors in reverse orientation or not. Some of the functions you could call on for the robot variable after that are as follows:
backward() Moves robot backward until stop() is called. forward() Moves robot forward until stop() is called. getAngle() Returns the angle the robot is facing relative to the +X axis direction getX() Returns the current x coordinate getY() Returns the current y coordinate goTo(float x, float y) Rotates and moves robot to the target point (x,y) goTo(float x, float y, true) as goTo but returns right away isMoving() returns true if the robot is moving under power rotate(float angle) Rotates the robot a specific number of degrees in a direction (+ or -). rotate(float angle, true) as rotate but returns right away setMoveSpeed(float speed) Set the movement speed in wheel diameter units/seconds. setTurnSpeed(float speed) Set the rotation speed in degree/seconds stop() Halts the robot and calculates new x, y and angle coordinates. travel(float distance) Moves the robot a specific distance. travel(float distance, true) as travel but returns right away
For more info about the SimpleNavigator class, click here.
The touch sensor is like a button or switch. It registers if something depresses it and reacts accordingly. This Sensor can be plugged in to any of 4 ports. Thus, you need to initialize it with a particular sensor port as input. The “new” keyword does exactly that: new creates a new instance of an object that is initialized with particular parameters:
Example:
TouchSensor touch = new TouchSensor(SensorPort.S1);
From then on you can call on the touch sensor’s function by using the newly defined reference variable touch (not TouchSensor) as well as the command:
For more info about the TouchSensor class, click here.
The sound sensor is like a micophone (and not a very good one). It registers noise level, i.e. if there is a loud or a soft noise. This sensor can be plugged in to any of 4 ports. Thus, you need to initialize it with a particular sensor port as input. The “new” keyword does exactly that: new creates a new instance of an object that is initialized with particular parameters:
Example:
SoundSensor mic = new SoundSensor(SensorPort.S2);
From then on you can call on the sound sensor’s function by using the newly defined reference variable mic (not SoundSensor) as well as the command:
For more info about the SoundSensor class, click here.
Light Sensor
The light sensor really has two parts: a light emitting diode (the lower bulb) and a light-measuring sensor (the upper bulb). You can operate it in active or passive mode. In active mode you turn on the lower light and measure its reflection; in passive mode you turn the lower light off and measure the ambient light intensity. Note that this sensor can not sense colors, it only senses light intensities. It could therefore distinguish two colors that have different grey-scale values (intensities) but not between all colors. This sensor can be plugged in to any of 4 ports and can start with the light on or off. Thus, you need to initialize it with two input parameters: one sensor port and whether the light should initially be on or off. The “new” keyword does exactly that: new creates a new instance of an object that is initialized with particular parameters:
Example:
LightSensor light = new LightSensor(SensorPort.S3, true);
This would create a light sensor with its light initially on. If you use false instead of true, the light would be off initially. From then on you can call on the light sensor’s function by using the newly defined reference variable light (not LightSensor) as well as the commands:
For more info about the LightSensor class, click here.
The ultrasound sensor is the most advanced sensor. It sends out a pulse of ultrasound (high frequency sound waves) called a ping and measures the time delay until it hears the echo. From that time and the speed of sound in air it can compute the distance to the object (if any) that reflected the sound wave. There are two problems with this sensor: (1) it only detects objects inside its "sound cone", and (2) each pulse takes time to measure, so it can take up to 80ms before the sensor can detect anything each time it pings. This sensor can be plugged in to any of 4 ports. Thus, you need to initialize it with a sensor port as input parameters. The “new” keyword does exactly that: new creates a new instance of an object that is initialized with particular parameters:
Example:
UltrasonicSensor light = new UltrasonicSensor(SensorPort.S4);
This would create an ultrasound sensor connected to port 4. From then on you can call on the sensor’s function by using the newly defined reference variable echo (not UltrasonicSensor) as well as the commands:
For more info about the UltrasonicSensor class, click here.
A variable is a name for a specific segment in memory. Every variable must have a type and should get an assigned value when it is setup. Everything and anything that your program needs to remember must be stored in a variable. In other words, variables are kind of name portions of the robot's mind. A variable name consists of letters, possibly followed by numbers, no spaces or strange characters, and usually starts with a small letter.
Variables can be of complicated types (such as variables of type TouchSensor) or of more elementary types (so-called basic types). The basic types in Java are:
Java type English meaning Exampes intinteger number 123, -42, etc. floatdecimal number 67.99f, -23.0f, etc. (note the mandatory f after the digits) charsingle character 'a', 'X', '1', etc. (a single letter enclosed in single quotes) booleanlogical constant true, false Stringlist of characters aka text "Bert Wachsmuth" (0 or more characters enclosed in double quotes)
To define variables of specific types you would use code similar to the following:
int x1 = -42;
float y1 = -9.7f;
char letter = 'b';
boolean state = true;
String name = "Bert"
TouchSensor touch = new TouchSensor(SensorPort.S1);
Note that while touch is not a variable of basic type, its definition follows a similar pattern.
There are several basic operations that you can do with these variables, depending on their type:
| for int and float | ||||
| + | ||||
| - | ||||
| * | ||||
| / | ||||
| % | ||||
| for boolean | ||||
| && | ||||
| || | ||||
| ! |
details
Bert G. Wachsmuth
Last modified:
10/16/09