MEASUREMENT OF ENZYME ACTIVITY
In this exercise and the one that follows you will study several aspects of enzyme behavior. The enzyme that you will use as a model of enzymes in general is peroxidase. Actually, it is one member of a group of similar enzymes which are found in nearly all living organisms. Peroxidase eliminates toxic H2O2 (hydrogen peroxide) which is normally produced in several metabolic reactions in cells. You may know that H2O2 is a common disinfectant and bleaching agent. It would damage many types of molecules in cells if it were not destroyed as soon as it appeared as a byproduct of normal metabolic activity in cells. [Another enzyme, catalase, also removes H2O2.] It's worth noting that the suffix -ase in a molecule's name using signifies an enzyme.
Tucked into the active site of the enzyme is a coenzyme molecule called heme, which is also found in hemoglobin. Recall from class that we saw NAD and FAD as coenzymes in some reactions of cellular respiration. In the peroxidase-catalyzed reaction, the substrates fit up against the heme coenzyme within the enzyme's active site. Another vocabulary connection: ‘Heme’ refers to a porphyrin molecule with an iron ion sitting at its center, like in hemoglobin.
Whatever organism it is in, peroxidase has two substrates, and both must be
present in order for the reaction to occur. One substrate is always H2O2.
The other may vary, depending on the cell or tissue the enzyme is in. The
peroxidase that you will study is in turnip tissue, from which you will extract
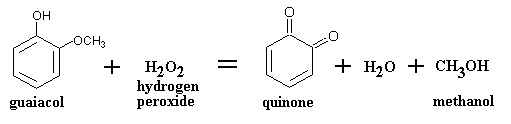
it. You will use a phenolic compound called guaiacol (pronounced
"GWY-uh-kawl;" the first syllable rhymes with "eye") as the
second substrate. [We've not studied phenolic compounds as such in this course.
For now, just view them as molecules that have a closed 6-carbon ring bearing
at least one hydroxyl group, like the amino acid tyrosine shown in your
text.] In the reaction catalyzed by peroxidase, a phenolic compound such
as guaiacol is oxidized to a quinone, as shown below. H2O2
is reduced to water as the guaiacol is oxidized to the quinone. Such
quinones, once formed, will spontaneously react with each other and with other
molecules to form colored complexes, a process similar to melanin formation in
skin.
The amount of the colored product formed in the reaction can be measured with
the colorimeter at 500 nm wavelength. So, you can actually see, with the naked
eye, the progress of this enzyme-catalyzed reaction in a matter of a few
minutes, and the Spectronic 20 colorimeter can be used to quantify the amount
of product formed. Then, by measuring the amount of colored product formed per
unit of time, you can calculate the rate of the reaction. You will
combine the enzyme and substrates in a solution in a colorimeter tube and follow
the change in percent transmittance of the solution. As the concentration of
the colored product increases, the percent transmittance of the solution
decreases.
Think of your work today as being organized as follows.
A. Preparation of the enzyme extract. The peroxidase enzyme will be extracted from live turnip tissue. You must extract (solubilize) the enzyme from the turnip tissue. Since this enzyme is quite a stable one, we can simply extract it in water rather than a buffer. As long as you keep it cold, it should remain active for the whole lab period.
B. Performance of the basic assay (test) procedure, using the enzyme extract. You'll combine measured volumes of enzyme extract with the substrates in a particular manner and then measure the development of colored product.
C. Use of the basic assay procedure to study several features of enzyme behavior, such as:
1. Necessity of the enzyme in the reaction. (Will the
reaction proceed without the enzyme?)
2. Necessity of both substrates in the reaction. (What happens if one substrate
is omitted?)
3. Effect of substrate concentration on reaction rate.
4. Effect of enzyme concentration on reaction rate.
5. Effect of high temperature on enzyme activity (next lab session).
6. Effect of pH on enzyme activity (next lab session).
6. Effect of a metabolic inhibitor on enzyme activity (next lab session).
The materials you need: (Wear gloves and splash goggles.)
|
1
large plastic beaker (for ice bath) |
1
test tube rack |
|
1
water squeeze bottle and RINSE cup (for rinsing glass tubes) |
4
pipets (2 ml capacity) |
|
1
cheesecloth pad (TA will demonstrate) |
4
pipet pumps |
|
food
processor (TA will demonstrate) |
3
large glass test tubes |
|
1
turnip (TA will demonstrate) |
2 colorimeter
tubes |
|
1
bottle of water |
Spectronic
20 colorimeter |
|
1
bottle of 0.1 % (v/v) H2O2 |
6"straightedge,
for plotting data |
|
1
bottle of 0.01 M guaiacol |
paper
towels and kimwipes |
|
graph
paper, linear-linear (You bring this.) |
**As you do the work now, think carefully about the steps and the results you get. What is happening and why is it happening? Can you describe and explain later what you did and saw in today's work. You will be asked.
A. Preparation of the enzyme extract. Though you could do this part, it will be done by the lab instructor (except for step "a"), one batch of enzyme extract from which all student pairs will take a sample. REVIEW THIS before starting.
a. First do this step yourself. .... Make an ice bath by putting ice in the plastic beaker (about 1/3 full) and adding tap water (to about 2/3 full). You'll keep the test tube containing the enzyme extract immersed in this bath. Add ice as needed. Note that even at room temperature most enzymes will gradually lose their activity (as they become denatured) after they have been removed from cells. Keeping the enzyme cold reduces or delays this loss of activity. Fortunately, turnip peroxidase is more stable than most enzymes and will retain its activity during the lab period if you keep the enzyme extract cold.
b. Use a paring knife to cut away the leafy sprout at the top of the turnip, if that's present. Then cut away the outer portion of the turnip, all the way around, leaving only a whitish central mass. [Cut away about 1/4 inch if the turnip is small (golf ball size), about 1/2 inch if larger.]
c. Dice the resulting "block" of turnip tissue into pieces about 1/4 inch in size. Weigh out 10 g of these pieces on a balance.
d. Put the 10 g of turnip pieces into the food processor (blender), and add 200 mL of deionized (or distilled) water.
e. Fit the lid onto the processor securely and be prepared to hold the lid in place so that the sloshing fluid within does not dislodge the lid.
f. Turn on the food processor to "liquefy," the highest speed setting. Let the grinding proceed for 60 seconds.
g. Fit 8 layers of cheesecloth into the white Buchner funnel sitting on top of a 250 mL Erlenmeyer flask. Strain the extract through the cheesecloth. Be careful to avoid tipping over the flask.
h. Dispense (the lab instructor will dispense) about 10 mL of the extract into one of your large test tubes. Then set the tube into your ice bath. This will be the enzyme extract that you will use for all of your assays today. Remember: keep the extract cold, in the ice bath; add ice as needed.
B. The basic assay procedure. REVIEW THIS before starting the assays.
1. First, some points to keep in mind....
You have a separate pipet for each solution to be measured: the enzyme extract, the guaiacol solution, the H2O2 solution, and water. Don't mix them up! Remember from a previous lab the instructions about use of the pipet pumps. (a) Never pipet by mouth. (b) Be careful inserting the pipets into the pumps. (c) Handle all solutions carefully, especially the guaiacol. It can cause irritation; so keep it off your skin. Change gloves as needed and wash your hands if any chemical contacts your skin. Don't confuse water with hydrogen peroxide; their chemical formulae are similar.
DO THE ASSAYS ONE AT A TIME. "Assay" here refers to doing the test one time, i.e. the process of combining the specified volumes of the various solutions in a test tube and then measuring a change in the %T with the colorimeter. Each assay is short and easy but must be done carefully.
After each assay, thoroughly rinse the test tubes and colorimeter tube before using them again for the next assay. You don't need to dry out the tubes between assays. The small volume of water adhering to the inside of the glass tubes is a source of error, for sure, but that volume is very small compared to the 5 mL assay volume each time. Further, the amount of water in the tubes each time will be virtually the same, producing the same small amount of error in each assay. Therefore, just drain the excess water from the tubes after each assay.
Measurements with the pipets must be as accurate as possible; inaccuracy here is a major source of error, i.e. "things not working". The other major source of error is failure to mix well the solutions in the test tube in each assay.
2. Now, the assay procedure itself....
Refer to the SETUP TABLE (two links: be sure to print both part 1 and part 2) to see what volumes of each solution go into each assay mixture. Assay #1 is your "blank"; use it to standardize the colorimeter to 100 %T after the instrument is warmed up and AFTER 0 %T is set. [Be sure you've set the proper wavelength too, 500 nm.] Since this is your third time to standardize the instrument, you should know how to do it by now. The lab exam will check. Since there is no enzyme in assay #1, there should be no reaction and, therefore, no color development. However, the glass, water, and substrates may absorb some light, and that factor must be corrected for. Review this concept if you don't remember it; it was part of your previous colorimetry study. Don't move the knobs on the front of the instrument after standardization is done.
Then for the rest of the assays (#2, 3, etc.) repeat the following steps:
a. Pipet into a large glass tube the specified volumes of guaiacol solution, deionized water, and H2O2 solution. IMPORTANT: carefully swirl the tube to mix the contents well. Set this tube in the rack.
b. Swirl the enzyme extract and then pipet the enzyme extract into a separate large glass tube. (Note that the reaction won't begin until you combine the enzyme with its substrates.)
c. Pour the contents of the first large test tube (the substrates) into the large test tube containing the enzyme extract. Swirl the tube, to mix the contents, and quickly pour the contents into the colorimeter tube, the small tube. IMMEDIATELY wipe (to dry and clean) the outside of the colorimeter tube and insert it into the colorimeter.
d. The needle will quickly rise to about 80 %T to 90 %T, more or less, and soon will start to fall. This %T drop means the colored product is forming, and absorbing light, as the enzyme catalyzes the reaction. [Why doesn't the needle go all the way up to 100 %T? (1)Note that the enzyme extract contains very fine "grit" (tissue fragments) that the cheesecloth did not remove; this material suspended in each reaction mixture will block some light. So, the needle won't return to 100%. (2) Also, since the reaction begins as soon as you combine enzymes with substrates, some colored product may form before you can insert the colorimeter tube into the instrument.]
e. Start timing when the needle reaches 70 %T and stop timing when the needle reaches 50 %T. Record that number of seconds for the assay.
f. Remove the tube from the sample well of the instrument. Note the depth of
color.
Pour the tube contents into the bottle marked WASTE.
Then rinse this colorimeter tube AND the two large glass tubes in which you
mixed the components. You have a squeeze bottle of water and a RINSE cup for
this. Refill the bottle with water as necessary and empty the RINSE cup
at the sink.
g. Repeat steps a. through f. for the next assay.
Caution: Some of the assays certainly will be slower than others; an understanding of that is a large part of what you're supposed to carry away from this exercise. However, depending on how well you extract the enzyme, some assays may be very slow. For example, if you think about #12 for a moment, how much time do you suppose would be needed for the needle to fall from 70 %T to 50 %T? Your recorded time value should be "a very large number of seconds" for any assay that takes longer than 4 minutes for the needle to get down to 70 % T or to fall from 70 %T to 50 %T. If the needle isn't moving, no reaction is occurring…right? And no product is forming…right? What would that tell you about the reaction rate?
C. Using the basic assay procedure to study enzyme properties
1. Effect of substrate concentration on reaction rate (Print the SETUP TABLE, part 1)
Assays #2-12 are a set; they show how changes in the substrate concentration affect the reaction rate of an enzyme. After you've studied the following comments, use the preceding basic assay procedure to do assays #2-12 one at a time. In each assay record (in the SETUP TABLE) the time, in seconds, needed for the needle to fall from 70 %T to 50 %T.
In this group of assays note that:
a. the assay volume is the same (5.0 mL).
b. the enzyme concentration is the same; we don't know the exact concentration of peroxidase, but each assay has 0.2 mL of the enzyme extract per 5 mL assay volume. So, the enzyme concentration is a constant.
c. the guaiacol concentration (that's one of the two substrates) is the same, since 2 mL of the guaiacol stock solution is used in each 5 mL assay. The concentration of guaiacol is sufficient so that this substrate does not limit the reaction rate in any of the assays.
d. The volume of H2O2 (the other substrate) is varied from one assay to the next. You need to calculate the H2O2 concentration (as %) in each assay. This will be your INDEPENDENT VARIABLE in the data plot.
e. Since the H2O2 concentration is changed from one assay to the next, the amount of water added is also adjusted, to compensate, i.e. to keep the total volume at 5 mL. If you increase the substrate concentration that is available to the population of dissolved enzyme molecules, then you'll expect to see more product formed (more substrate consumed) per unit of time. The rate of enzyme activity is the amount of product formed per unit of time OR the amount of substrate consumed per unit of time. Substrate consumption by the enzyme is obviously related to product formation.
Your indicator of rate of the reaction is the time needed for the %T value to fall from 70 %T to 50 %T. CONSIDER CAREFULLY that this range of %T values corresponds to a range of colored product concentrations. As you learned in your previous colorimetry work, a 50 %T value corresponds to a higher concentration of colored substance than does a 70 %T value. Therefore this designated %T range (70 %T to 50 %T) corresponds to a certain amount of colored product formed in the 5 ml assay volume; and that amount of colored product is the same in each assay. What varies from one assay to the next is the time needed for the needle to fall from 70 %T to 50 %T, and that depends on the H2O2 (substrate) concentration that you start with.
It has been separately determined that the amount of colored product that corresponds to the difference between 70 %T and 50 %T is 200 micromoles. That will be the same for every assay, since in every assay you're using that 70 %T to 50 %T range. In each assay, then, you will calculate the rate of the reaction by dividing 200 micromoles (the amount of product) by the time which you measure (in seconds) for each assay. The reaction rate will be your DEPENDENT VARIABLE in the data plot.
After you've completed assays #2-12:
1. For each assay, except tube #1, calculate the reaction rate and the H2O2 concentration, as % (v/v). The stock bottle contains 0.1% (v/v), so each assay's H2O2 concentration will be a dilution of that. You should also be able to calculate H2O2 concentration expressed as molarity; assume that hydrogen peroxide (34 daltons) is 1 g/mL, like water.
2. Plot the reaction rate (dependent variable) versus H2O2 concentration (independent variable). If the work has been done carefully, the set of plotted points should approximate the shape of the Michaelis-Menten curve.
****Assay #12 is the origin (should be 0,0). Rate values should rise sharply as substrate concentration is increased from one assay to the next. At the highest substrate concentrations the rate should level off, indicating "saturation" of the available enzyme. Increasing substrate concentration will not raise the rate any more because all of the available enzyme is working at the maximum rate possible.****
2. Effect of enzyme concentration on reaction rate (Print the SETUP TABLE, part 2)
In assays #13-15 you see that the substrate concentrations (both substrates) are held constant whereas the enzyme concentration is varied. Perform these three assays in the usual manner; in each assay record (in the SETUP TABLE, part 2) number of seconds needed for the needle to fall from 70 %T to 50 %T. What would you expect to happen to the rate in this set of three assays? Think of it this way: if the amount of work to be done is held constant but the number of workers is changed, what happens to the amount of work done per unit of time?
3. Reproducibility of results
For assays #16-18 you will perform one assay, the same as #5 earlier, three times, as nearly the same as you can. Then compare the four time values that you got. You expect the four to be the same, since you put the same volumes of the same solutions into each assay, #5 and #16-18. If the values are not exactly the same, how do you explain the variation? What is the true value for that combination of volumes of the test solutions?
How do your four values compare with those of other students? Check around. Why did other students not get exactly the same values that you did?
Check all of your results with your lab instructor.
When you're done:
1. Put pipets (but NOT the blue pumps) in the tall cylindrical soak jar at the side of the room.
2. Remove colorimeter tube from instrument’s sample chamber.
3. Clean test tubes and colorimeter tubes and place them in the rack upside
down to dry.
4. Clean your work area.
5. Turn off the colorimeter.
6. Wash your hands (even though you wore gloves).