NXT/Java Software Setup
Home -> Teaching -> CSAS 3085/PSYC 3698 -> Building and Programming -> Setup
The NXT kit comes with its own programming software, where you can create programs by visually connecting icons together without having to type any instructions. That type of programming is very easy to learn, but is limited: complex programs require a more flexible approach.
You can, in fact, program the NXT in many different programming languages, including Java, a modern, very flexible and widely adapted language developed by SUN Microsystem that still is relatively easy to learn. Thus, we will choose Java as our programming language for the NXT.
Since the that language does not come with the NXT kit, you will need to download and install a number of software pieces that in the end will all work together to allow the easy creation of NXT programs in Java. Installation requires multiple steps and is not for the faint of heart - you should have experience with downloading and installing program, but if you follow the instructions carefully you should have no problems. Still, if someone offers to do this installation for you, do accept his/her offer.
First, download all of the following software to your laptop (we assume you are using a Windows-based system). Make sure to download it to a location that you remember (e.g. your desktop).
If you happen to have installed the original NXT 1.1 software you do not need to download the LEGO NXT driver; it is included in that software. Note that the last two files are compressed files (zip) - you should also save them your disk, not open them (at this time).
Installing, configuring, and testing is a multi-step and rather technical process. I would recommend that you schedule an appointment so that I can install the software for you. It will take me about 10 minutes, assuming you have the above software already downloaded. But if you prefer and are technically fearless, you could do the installation/configuration yourself by following the steps below carefully.
First, install the Java compiler: double-click the downloaded file jdk-6u16-windows-i586.exe and follow the instructions. Accept all defaults. It will take some time and you have to accept a number of default options. You will be brought to an optional registration screen when everything is finished: simply close that screen without registering.
Second, install the Java editor: double-click the downloaded file eclipse.exe. You will be asked to select a destination folder: type c:\eclipseNXT exactly as shown:
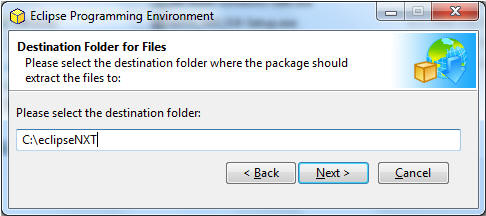
Then click Next to install the software without any further questions.
Third, install the LEGO NXT driver. You can skip this step if you happen to have the original NXT software version 1.1 installed. If you do need to install the driver, double-click on the downloaded file NXT_Driver.zip. A window will open so that you can double-click on the folder NXT_Driver32. You should see a list of files - double-click on the (first) file named "LegoMindstormsNXTdriver32" and follow the instructions.
Fourth, install the LeJOS Java - NXT components: double-click the downloaded file leJOS_NXJ_0.8-Setup.exe. You will see a browser window from where you can install the Java compiler. Since we already did that in the first step you can close the browser window and continue with your LeJOS installation. Accept all defaults. In the last step another dialog will open to "Install NXJ Firmware in NXT". The NXT brick you received already has the proper firmware installed so you can simply quit this program (or check the appendix to see how to "flush the firmware"). When you are done, the LeJOS installation program will also quit.
You now have installed all the software you need. To save space, you could delete the four installation programs you downloaded in step 1, except the "winpathed" program, which we will need shortly). Note: if you are using an original NXT brick with the original NXT firmware, please refer to the appendix for how to "flush the firmware".
Our next step - the most difficult one - is to configure the different software packages so that they can work together.
3.1. Updating your path: First we have to properly notify the operating system that you have installed a new Java compiler. Double-click the (compressed) "winpathed" program and open the "winpathed" folder. If you are using Window Vista or above, right-click on "winpathed" and select "Run as Administrator", otherwise just double-click on the program.
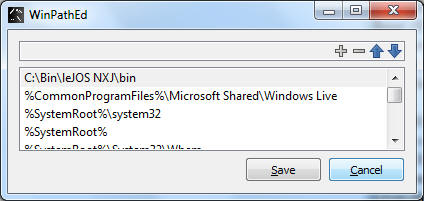
Click on the little "plus" sign and browse to the folder c:\Program Files\Java\jdk1.6.0_16\bin. Then click "Choose' to add that path as the last entry to the list. Click "Save", then quit the program by pressing ALT-F4. If you get an "Access denied" message, make sure you run the program with administrator rights. You can now delete the "winpathed" utility program from your disk, we won't need it again.
3.2. Start Eclipse: Open the folder eclipseNXT on your drive C: and double-click on the (first) "eclipse" program. You might want to create a shortcut to this program on your desktop sine we will need to do this frequently later. You will be prompted to select a workspace. Click "Browse" and select the folder "leJOSNXTProjects". If you subsequently start Eclipse, this folder will be pre-selected for you already. You should now see the Eclipse welcome screen.
3.3. Setup your NXT Project folder: Select "File | New | Java Project" and name your project NXT. Under "Project layout", select "Use project folder as root for sources and class files", then click "Next".
Under the "Java Settings" dialog, click on the "Libraries" tab, then click "Add External JARs...". Browse to the directory "c:\Program Files\leJOS NXJ\lib" and select the file "classes" or "classes.jar". Then click "Finish".
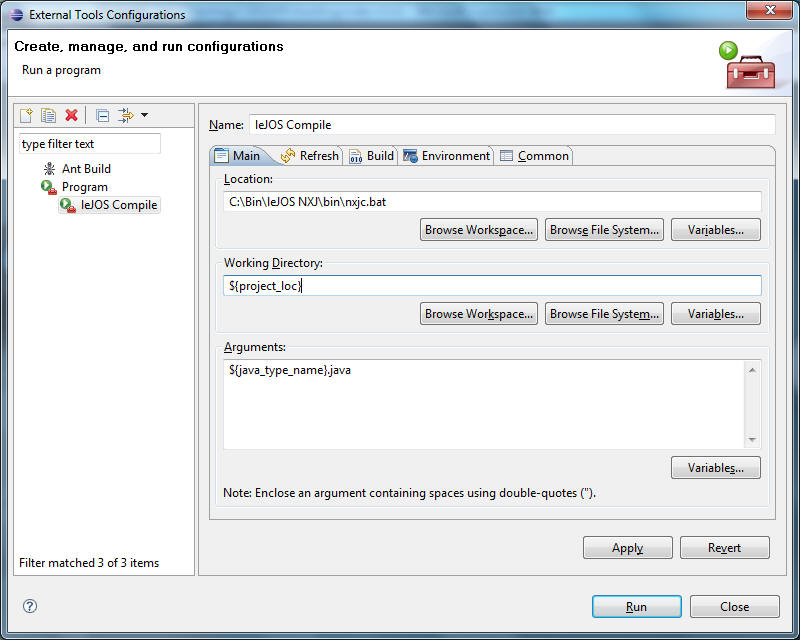
3.4. Setup your Eclipse Tools: From the menu select "Run | External Tools | External Tools Configurations ...". On the left side you will see your existing configurations, such as "Ant Build" and "Program". Click on "Program", then click the "new launch configuration" button (it looks like an empty page with a plus button in the upper right corner):
Once again, click on "Program", then click the new launch configuration button.
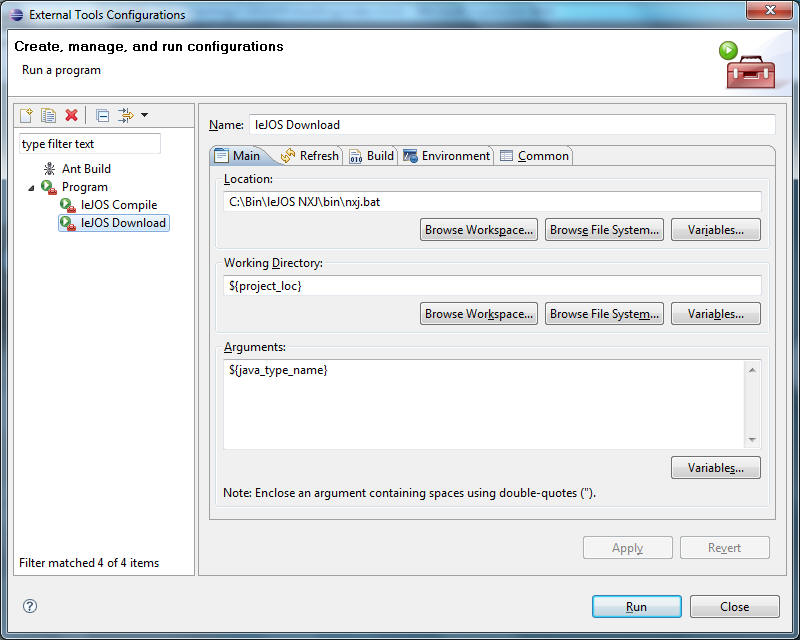
We are almost done, but we still need to add convenient buttons to access our new configurations. Click on the "Run" menu once again and pick "External Tools | Organize Favorites ...". Click the "Add" button, check both of the configurations we just created, then click "OK", and "OK" once again. This will create two new entries in the "Run tools" drop-down button that you can select from the button bar:
If you still see the Eclipse welcome screen, close it to see your default Eclipse screen with your "NXT" project in the upper-left corner.
At this point everything should be in place and we can create and run our first program. This is usually a three step process: (1) create a program in the Java programming language, (2) translate it to machine code and download it to your NXT, and (3) execute the program on your NXT (and hope for the best). Let's go:
4.1. Create program: start Eclipse, if it is not already up. After picking the default workspace leJOSNXTProjects you should see the default Eclipse screen with the "NXT" project in the upper-left corner. Right-click on the NXT project and select "New | Class". Name your class "Test" (spelled just like this including capitalization), check the entry to create the method stub "public static void main(String args[])", and un-check "Generate comments".
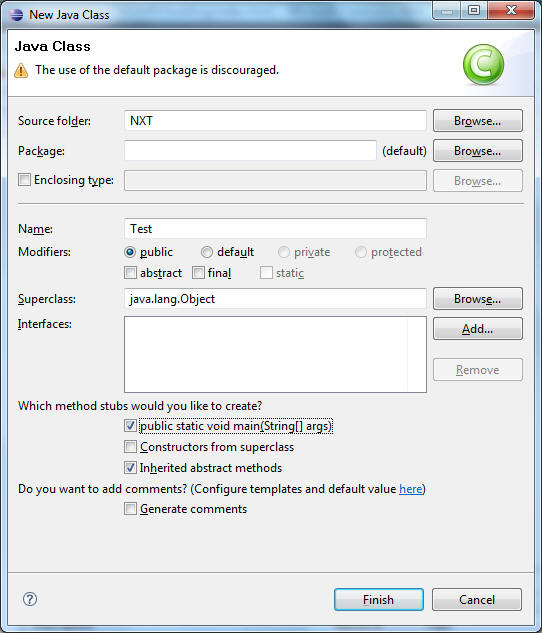
Then click 'Finish". You will see a "default" program that looks like the following:
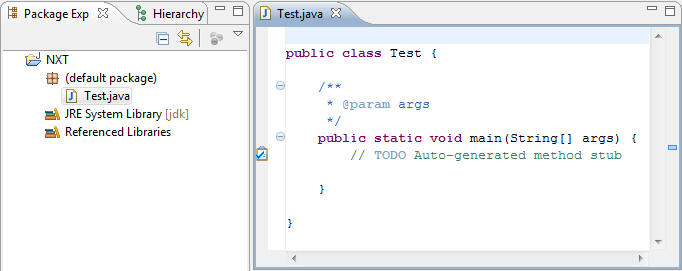
Erase the green and blue comments, move the opening curly brackets to a new line by themselves and type in the lines shown below in bold so that your program looks exactly like the one below - including all commas (there are none), semi-colons (there are plenty), capitalization, spaces, regular parenthesis, and curly brackets. The code that changes is shown on bold.
import lejos.nxt.*;

public class Test
{
	public static void main(String[] args) throws Exception
	{
		LCD.refresh();
		LCD.drawString("I am ALIVE", 1, 1);
		Thread.sleep(5000);
	}
}
You should see no errors (i.e. no red squiggly underlining), so save your program.
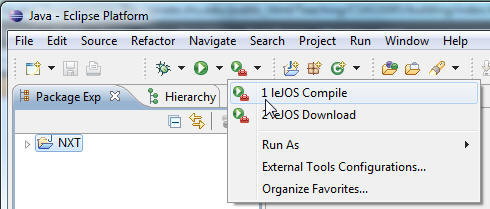
4.2. Translate and transfer: next you need to translate it into machine code that the NXT can understand, so click on the "Run Tools" dropdown button on the button bar and select "leJOS Compile":
Nothing should happen - no news is good news - but Eclipse has translated your program into machine code. If there were any errors you would be notified.
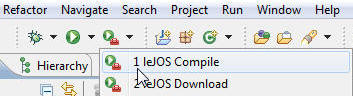
Finally you can download your program to the NXT:
4.3 Execute your program: once you have translated your program and transfererd the machine code to the NXT, you can disconnect the USB cable and run your program on the NXT:
on your NXT click the right arrow button to select "Files" and press ENTER, then, if necessary, use the arrow keys to select your downloaded program called "Test.nxj". Press ENTER, then ENTER again to "execute program".
If all goes well, the LCD screen of your NXT should change and display your message for 5 seconds. Then it will return to normal.
CONGRATULATIONS (I hope). You have installed the Java tools needed to program your NXT in Java. Thankfully you will not need to perform these steps again.
Please continue reading about the Principles of (Java) programming or - if you have programmed in Java before - go straight to how to program the NXT in Java.
Bert G. Wachsmuth
Last modified:
09/08/09