Layouts and more GUI Examples
- More on Layout Managers:
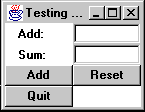
- Last time we have introduced layout managers. Let's experiment with them a little further and take a look at our "summation program" again. It looks, approximately, like the code below.

   private void setup()
   {
      setLayout(new GridLayout(4,3));
      add(inLabel);
      add(input);
      add(outLabel);
      add(output);
      add(add);
      add(reset);
      add(quit);
   }
Adding components when a GridLayout is specified will add them by first
filling up the columns in the first row, then in the second row, and so on. In our case,
it will result in the following layout: 
Notice that all cells in the table have the same dimensions. That is one of the properties of a GridLayout.
Question: What will happen when adding more components than available cells? Just change the code above to find out for yourself.
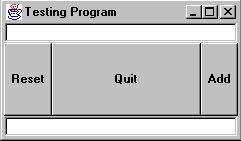
Next, let's change to a BorderLayout. Here we can add components to the East, West, North, South, or Center, and we have to indicate these area when adding a component. Here's the code:
Note: To Instantiate a BorderLayout, no input parameters are necessary. But when components are added, the strings "East", "West", "North", "South", and/or "Center" must be used.
private void setup()
{
setLayout(new BorderLayout());
add("North",inLabel);
add("North",input);
add("South",outLabel);
add("South",output);
add("East",add);
add("West",reset);
add("Center",quit);
}

   private void setup()
   {
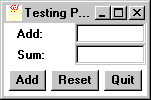
      Panel info    = new Panel();   // panel for the number and labels
      Panel buttons = new Panel();   // panel for the buttons

      info.setLayout(new GridLayout(2,2));  // methods of the info panel
      info.add(inLabel);
      info.add(input);
      info.add(outLabel);
      info.add(output);

      buttons.setLayout(new FlowLayout());  // methods of the buttons panel
      buttons.add(add);
      buttons.add(reset);
      buttons.add(quit);

      setLayout(new BorderLayout());       // methods of the frame
      add("South",buttons);
      add("Center",info);
   }

![]()
public class List extends Component
{   // Constructors
    public List();
    public List(int  rows, boolean  multipleSelections);
    // Methods
    public void addItem(String  item);
    public void clear();
    public int countItems();
    public void delItem(int  position);
    public String getItem(int  index);
    public int getSelectedIndex();
    public String getSelectedItem();
    public boolean isSelected(int  index);
    public void replaceItem(String  newValue, int  index);
    public void select(int  index);
}
Here is a code segment to setup a list with 4 rows, only one row can be selected at any time, and the names of some planets are added to the list:
List planets = new List(4, false);
planets.addItem("Mercury");
planets.addItem("Earth");
planets.addItem("Mars");
planets.addItem("Jupiter");
planets.addItem("Uranus");
planets.addItem("Pluto");
That list can then be added to a frame or a panel using the appropriate layout manager
and the add method.
![]()
TextArea: A text area is a multiline area for displaying text. It can be set to
allow editing or to be read-only.
public class TextArea extends TextComponent
{   // Constructors
    public TextArea();
    public TextArea(int  rows, int  cols);
    // Methods
    public void appendText(String  str);
    public int getColumns();
    public int getRows();
    public void insertText(String  str, int  pos);
    public void replaceText(String  str, int  start, int  end);
}
For example, here is some code to instantiate a TextArea and add two lines of test to it.
TextArea output = new TextArea(4, 25);
output.appendText("This is my name:\n");
output.appendText("Bert Wachsmuth");
That text area can then be added, as usual, to a Frame or a panel. Note that the
"escape sequence" \n means to add a carriage return (new line), so that the
first line will read "This is my name" and the second line will be: "Bert
Wachsmuth", and the "\n" indicates to switch to a new line.
![]()
So far, we have seen the following GUI components:
| Button: a button to click on. User action can be checked in the action method | |
| TextField: an area to enter a single line of text | |
| Label: a one-line, non-editable text string | |
| List: a scrollable list of text items | |
| TextArea: a multi-line area for displaying text |
| Panel: a class to group components together using various layout managers |
It is essential that you understand these classes together with their most basic
methods.
![]()
Now let's put our knowledge together in two reasonably long examples:
Example 1: Create a 'to-do' list for your self. You want to be able to add items to the list, delete items from the list, you need to see all items in the list, and you want to quit the program. Actually, you really also want to save your list, but we will not cover that right now.
First, let's identify the GUI components we need:
| Buttons: an Add button, a Delete button, and a Quit button | |
| TextField: a single-line area to enter a new task. The new task is added to the list when the user clicks on the Add button | |
| List: a scrollable list containing all tasks that have been added. A task can be deleted by clicking on it, then clicking on Delete. | |
| Perhaps a label saying 'Task:' in front of the text field |
Next, let's think about a layout we want:
| The three buttons should go in one row at the bottom of the frame | |
| The TextField should go on top, together with the label in front of it | |
| The List should occupy the rest of the space, i.e. the center |
We've already done the hard part, thinking about exactly what we want to do, and how things should look. The rest is easy. Let's create our program in stages.
First, let's define the fields we need:
Button addButton = new Button("Add");
Button delButton = new Button("Delete");
Button quitButton = new Button("Quit");
TextField newTask = new TextField(25);
Label taskLabel = new Label("Task:");
List tasks = new List(5, false);
Alright, that was easy. Now let's produce the code for the layout we have chosen. We clearly need a FlowLayout for the buttons, another FlowLayout for the label and the text field, and a BorderLayout to put everything together, including the task list. Here we go:
Panel buttons = new Panel();
buttons.setLayout(new FlowLayout());
buttons.add(addButton);
buttons.add(delButton);
buttons.add(quitButton);
Panel input = new Panel();
input.setLayout(new FlowLayout());
input.add(taskLabel);
input.add(newTask);
setLayout(new BorderLayout());
add("South", buttons);
add("North", input);
add("Center", tasks);
So, here is the complete class, as we have it so far:
import java.awt.*;

public class Task extends Frame
{  // fields
   private Button addButton = new Button("Add");
   private Button delButton = new Button("Delete");
   private Button quitButton = new Button("Quit");
   private TextField newTask = new TextField(25);
   private Label taskLabel = new Label("Task:");
   private List tasks = new List(5, false);
   // constructor
   public Task()
   {
      super("Task List");
      setup();
      validate();
      pack();
      show();
   }
   private void setup()
   {
      Panel buttons = new Panel();
      buttons.setLayout(new FlowLayout());
      buttons.add(addButton);
      buttons.add(delButton);
      buttons.add(quitButton);

      Panel input = new Panel();
      input.setLayout(new FlowLayout());
      input.add(taskLabel);
      input.add(newTask);

      setLayout(new BorderLayout());
      add("South", buttons);
      add("North", input);
      add("Center", tasks);
   }
}
This will compile correctly, but it will not run correctly. First, there is no standard main method, so obviously it will not execute. Moreover, there is no 'action' method to actually act according to the buttons that the user presses, so nothing can happen anyhow.
So, let's think about the action method:
| if a user clicks the quit button, the program should, naturally, quit. We can use the System.exit(0) method for that, so that's okay | |
| if a user clicks on the add button, the program should take whatever is in the newTask text field and add that to the task list. That's easy: the method to read from a text field is 'getText', and the method to add a String to a list is 'addItem' | |
| if a user clicks on the delete button, we should first check if there's an item in the task list selected. If so, remove that item from the task list. |
So, here goes the code for the action method:
public boolean action(Event e, Object o)
{
   if (e.target == quitButton)
      System.exit(0);
   else if (e.target == addButton)
      tasks.addItem(newTask.getText());
   else if (e.target == delButton)
   {
      if (tasks.getSelectedIndex() >= 0)
         tasks.delItem(tasks.getSelectedIndex());
   }
   return true;
}
![]()
| a TextField to enter a new number | |
| a Label explaining the text field | |
| a Button to add the number from the text field to the existing numbers | |
| a display area to inform the user about the numbers already entered, and to display the answers. Since that will contain multiple lines, we will use a TextArea for this | |
| a Button to quit the program |
Label label = new Label("Number:");
TextField input = new TextField(10);
Button addButton = new Button("Add");
Button quitButton = new Button("Quit");
TextArea output = new TextArea();
| we arrange the label, the text field, and the add button in a row | |
| we add that row at the top of the frame, and the text field in the center | |
| we add the quit button at the bottom of the frame |
Panel topRow = new Panel();
topRow .setLayout(new FlowLayout());
topRow .add(label);
topRow .add(input);
topRow .add(addButton);

setLayout(new BorderLayout());
add("North", topRow);
add("Center", output);
add("South", quitButton);
import java.awt.*;

public class Average extends Frame
{  // fields
   private Label label = new Label("Number:");
   private TextField input = new TextField(10);
   private Button addButton = new Button("Add");
   private Button quitButton = new Button("Quit");
   private TextArea output = new TextArea();
   // Constructor
   public Average()
   {
      super("Finding Average");
      setup();
      validate();
      pack();
      show();
   }
   private void setup()
   {
      Panel topRow = new Panel();
      topRow .setLayout(new FlowLayout());
      topRow .add(label);
      topRow .add(input);
      topRow .add(addButton);

      setLayout(new BorderLayout());
      add("North", topRow);
      add("Center", output);
      add("South", quitButton);
   }
}
| an array of integers to contain the 20 numbers | |
| a counter to tell us how many numbers have been added so far | |
| a constant maxNumber that's set to 20, so that we could easily modify our program to handle more than 20 numbers |
int Integer.parseInt(String s)
public boolean action(Event e, Object o)
{
   if (e.target == quitButton)
      System.exit(0);
   else if (e.target == addButton)
   {
      theNumbers[counter] = Integer.parseInt(input.getText());
      output.appendText("Number added: " + theNumbers[counter] + "\n");
      counter++;
   }
   return true;
}
import java.awt.*;

public class Average extends Frame
{  // fields
   private int MAXNUMBERS = 20;
   private int theNumbers[];
   private int counter = 0;

   private Label label = new Label("Number:");
   private TextField input = new TextField(10);
   private Button addButton = new Button("Add");
   private Button quitButton = new Button("Quit");
   private TextArea output = new TextArea();
   // Constructor
   public Average()
   {
      super("Finding Average");
      setup();
      validate();
      pack();
      show();
   }
   public boolean action(Event e, Object o)
   {
      if (e.target == quitButton)
         System.exit(0);
      else if (e.target == addButton)
      {
         theNumbers[counter] = Integer.parseInt(input.getText());
         output.appendText("Number added: " + theNumbers[counter] + "\n");
         counter++;
      }
      return true;
   }
   private void setup()
   {
      Panel topRow = new Panel();
      topRow.setLayout(new FlowLayout());
      topRow.add(label);
      topRow.add(input);
      topRow.add(addButton);

      setLayout(new BorderLayout());
      add("North", topRow);
      add("Center", output);
      add("South", quitButton);
   }
}
| we forgot to allocate memory for the array. Remember, we need to declare the array (which we did, as a field), we need to allocate memory (with 'new', which we did not do), and we need to populate the array (which we do in the 'action' method. | |
| we forgot to compute and display the average once the numbers have been entered |
![]()