Lecture 5: Simple Programs with a GUI
- To see how we could use the Frame class to create our own programs, here is a simple
example:
import java.awt.Frame;

public class TestFrame extends Frame
{
   public TestFrame(String title)
   {
      super(title);
      resize(100,100);
      show();
   }
}
Save above code in a file name TestFrame.java...
public class TestMain
{
   public static void main(String[] args)
   {
      TestFrame frame = new TestFrame("Test Program");
   }
}
Save above code in a file name TestMain.java...
To run the program after successfully compiling it, type
If you are trying to run a class file, Java looks for a method named main. If
that method exists, it executes it. Otherwise, it generates an error message. Hence, all
Java programs must start with the main method.
In our case, the main method instantiates an object called TestFrame which extends Frame
(and hence also extends all classes mentioned in the previous hierarchy. That object's
constructor calls its superclass constructor with the title argument, then calls
upon the resize and show methods to first resize the frame to 100 by 100
pixels, then shows the frame on the screen.
It is important to understand why things happen and at what time: the main method
is the beginning of every standalone Java program. Usually, it is very short and is used
as a basic setup method to start other objects which in turn will do all of the work that
the program is supposed to accomplish. In this case, the constructor of the newly
instantiated object TestFrame is responsible for resizing and showing the frame on the
screen.
However, if you do run this program you will notice that while the Frame (with the
appropriate title) will indeed appear on the screen, clicking on the close boxes will
not close the program. In fact, there is no way to close this program down nicely, since
we did not build in the necessary methods to accomplish that. The program needs to be
killed, using whatever 'kill' mechanism your operating system provides (the word 'kill' is
used because to shutdown programs in a Unix environment, the system command to use is
named kill).
Not being able to quit a program is, of course, not a good idea, so let's add a button
to quit the program. Our first step would be to look up the appropriate class in the
java.awt package. You will find there a Button class, which sounds like it would
be the appropriate class to use. Here is the description of the Button class with the most
important methods:
public class java.awt.Button extends java.awt.Component
{
        // Constructors
    public Button();
    public Button(String  label);

        // Selected Methods
    public String getLabel();
    public void setLabel(String  label);
}
Note that the Button class extends the Component class which we have already seen in the
previous lecture. Before we can add any components to our Frame, we need to decide where
it should go. Layout of GUI components in Java is handled by Layout Managers. There
are several layout managers available. For now we will use a FlowLayout which means that
all components will be layed out in one row, one after the other, in the order they were
added. Here is the modified program that will set the layout of our frame to a FlowLayout
and add a Quit button to the frame. Note that since we are now using the classes Button
and FlowLayout, we need to import them from the java.awt package. In fact, to be safe, we
will import all classes from the java.awt package. The lines that have changed from the
previous version are printed in bold. The public class TestMain does not change at all,
so no need to retype that class (I don't list it here again):
import java.awt.*;

public class TestFrame extends Frame
{
   Button Quit = new Button("Quit");

   public TestFrame(String title)
   {
      super(title);
      setLayout(new FlowLayout());
      add(Quit);
      resize(100,100);
      show();
   }
}
While this will indeed place a button labeled "Quit" in the middle of the
window, nothing actually happens when we click on that button. Just because the button
says "Quit" does not mean that the corresponding action will indeed occur.
To see how we can accomplish our next step, we need to understand event-driven
programming.
Before describing events, note the line that says:
setLayout(new FlowLayout());
The setLayout is a call to an existing method of a Frame, and that method, if
you look it up in the Java API, requires as input a Layout Manager. In this case,
we use a FlowLayout as input. Technically, the call new FlowLayout() instantiates
a new class and passes that new instance to the setLayout method, but does not
use a special variable or field to store that class. That is convenient if we only need
the class once.
For example, instead of adding a button Quit as a field to our class, and then adding
that field to the Frame via the add(quit) method, we could have instead said add(new
Button("Quit")). That, for now, would have the same effect, but we could
not refer to the quit button any longer in the rest of the program. Since we do need
the quit button elsewhere in the program, we have chosen to use a field for it. The
layout, on the other hand, will not be needed any more.
Now, let's return to event handling: any action that a user takes, such as pressing a
key, moving the mouse, clicking on a button, selecting a menu etc, generates an event of
various types. When an event occurs, it is passed to the various components that make up a
Java program, and those components can choose to act upon the event. Some of the most
frequent events are action events such as clicking the mouse, events such as selecting a
close box, and mouse moving and dragging events. When those events occur over a
Frame object, the event is automatically passed to existing methods of a frame. What the
programmer has to do is
 | to understand what user action will generate which type of event |
| which existing method is called upon to handle that event type |
| how to override the method so that a useful action ensues |
Here is our next version of the TestMain program that will now actually quit when the
quit button is pressed. The TestMain object remains unchanged, and in the TestFrame object
the new code is displayed in bold:
import java.awt.*;

public class TestFrame extends Frame
{
   Button Quit = new Button("Quit");

   public TestFrame(String title)
   {
      super(title);
      setLayout(new FlowLayout());
      add(Quit);
      resize(100,100);
      show();
   }

   public boolean action(Event e, Object arg)
   {
      if (e.target == Quit)
      {
         hide();
         dispose();
         System.exit(0);
         return true;
      }
      else
         return false;
   }
}
Recall that the action method is part of the Component method (which is a superclass of
our TestFrame object, several levels removed). This method is automatically called when an
'action event' takes place in the Frame object. We have now overridden that method to hide
the frame, dispose it, and finally call the System.exit method. This last method will
simply try to return all resources to the operating system and quit the current program,
returning an exit code of 0 to the operating system (because 0 was used as input
parameter to the System.exit method). Before executing the System.exit method (and thereby
shutting down our program) we first check if the action event had as its target our Quit
button. If so, quit the program and return true (to indicate that our action method
handled the event), otherwise return false (to indicate that our action method did not
handle the event). We could, in fact, decide to also pass the event along to the
superclass' action method, if desired.
Next, we want to add a text field to our program and a second button called 'action'. If
the action button is clicked, some text should be displayed in the text field, the Quit
button should still work as before. First, we need to find the definition of a TextField:
public class java.awt.TextField extends java.awt.TextComponent
{
        // Constructors
    public TextField(int cols);
    public TextField(String  text);

        // Selected Methods
    public char getEchoChar();
    public void setEchoCharacter(char  c);
}
Note that the TextField class extends TextComponent:
public class java.awt.TextComponent extends java.awt.Component
{
        // Selected Methods
    public String getText();
    public boolean isEditable();
    public void setEditable(boolean  t);
    public void setText(String  t);
}
This class in turn is a subclass of the Component class which we have seen before. Here
is our new program (which the changed code in bold):
import java.awt.*;

public class TestFrame extends Frame
{
   Button Quit = new Button("Quit");
   Button Action= new Button("Action");
   TextField Output = new TextField(20);

   public TestFrame(String title)
   {
      super(title);
      setLayout(new FlowLayout());
      add(Output);
      add(Action);
      add(Quit);
      validate();
      pack();
      show();
   }

   public boolean action(Event e, Object arg)
   {
      if (e.target == Quit)
      {
         hide();
         dispose();
         System.exit(0);
         return true;
      }
      else if (e.target == Action)
      {
         Output.setText("Button was clicked");
         return true;
      }
      else
         return false;
   }
}
Note that by now you should have a pretty good understand of why this program will do
what it does. One thing to note, however, is that we replaced the resize(100,100) method
with the validate() and pack() methods. That will optimize the frame so that all
components, properly layed out according to the chosen layout manager, will fit just right
into the frame.
Next, we will add another event handler that will produce some action any time the mouse
is clicked inside the frame. Recall that the component class has methods named mouseDown,
mouseUp, etc. Since we do want to override these methods, we have no choice for the
parameter list: we must use the same one as the given method has, otherwise we would
overload instead of override the appropriate methods. Here's the code, again with the new
code in bold:
import java.awt.*;

public class TestFrame extends Frame
{
   Button Quit = new Button("Quit");
   Button Action = new Button("Action");
   TextField Output = new TextField(20);

   public TestFrame(String title)
   {
      super(title);
      setLayout(new FlowLayout());
      add(Action);
      add(Output);
      add(Quit);
      validate();
      pack();
      show();
   }
   public boolean action(Event e, Object arg)
   {
      if (e.target == Quit)
      {
         hide();
         dispose();
         System.exit(0);
         return true;
      }
      else if (e.target == Action)
      {
         Output.setText("Button was clicked");
         return true;
      }
      else
         return false;
   }
   public boolean mouseDown(Event e, int x, int y)
   {
      Output.setText("Mouse down");
      return true;
   }
   public boolean mouseUp(Event e, int x, int y)
   {
      Output.setText("Mouse up");
      return true;
   }
}
Before clicking the mouse anywhere, make sure you resize the window so that there's some
empty space somewhere. Then click the mouse in various places. Also, hold it down for a
little, then let it go. See what happens in the Output field.
Next, we want to try to do a complete, reasonably useful program - yet not too
difficult. Let's say we want to keep a running total of integers. One idea would be to use
a while loop, asking for user input, and adding the appropriate numbers. However, programs
with a GUI are event driven, and the phrase 'waiting for user input' in meaningless.
After all, user input could come at any time in form of clicking or moving the mouse,
touching a key, clicking on a button, etc.
Let's decide to reuse the button labeled "Action". When a user clicks that
button, the number that is currently in the TextField will be added to the sum. The
current value of the sum should be updated each time the "Action" button is
pressed. (of course, we could also rename the button and its label). We also need the
"Quit" button to quit the program. We do not need to intercept mouse click
events any longer. Here's the code that accomplishes that:
import java.awt.*;

public class TestFrame extends Frame
{
   Label  Status = new Label("current sum");
   Button Quit = new Button("Quit");
   Button Action = new Button("Action");
   TextField Output = new TextField(20);

   int Sum = 0;

   public TestFrame(String title)
   {
      super(title);
      setLayout(new FlowLayout());
      add(Action);
      add(Output);
      add(Status);
      add(Quit);
      validate();
      pack();
      show();
   }

   public boolean action(Event e, Object arg)
   {
      if (e.target == Quit)
      {
         hide();
         dispose();
         System.exit(0);
         return true;
      }
      else if (e.target == Action)
      {
         String toAdd = Output.getText();
         Sum += Integer.parseInt(toAdd);
         Status.setText(String.valueOf(Sum));
         return true;
      }
      else
         return false;
   }
}
A couple of things should be noted:
| a Label object has been added to our layout. Labels contain non-editable information |
| The getText and setText methods are used to retrieve info from the TextField and store
the new sum in the Label |
| The getText method will always return a string, and the setText method must have a
String as input |
| To convert a number to a String, one can us the String.valueOf(number) method |
| To convert a String to an integer, one can use the Integer.parseInt(String) method |
The rest of the program has not really changed too much and is easy to understand.
Here's a question, though: What happens if a non-integer is entered into the
TextField.
To create more interesting programs, we need to know more about the layout managers that
are available to us. Java offers the following layout managers:
| FlowLayout |
arranges all components in one row. If the components do not fit in one row, an attempt
is made to 'wrap' the components to the next row.
| GridLayout |
arranges all components in table form with a specific number of rows and columns. All
cells in the table will be of equal size, corresponding to the largest component that is
added to the grid.
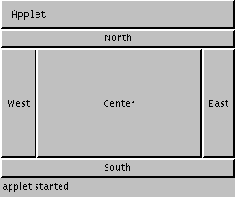
| BorderLayout |
arranges components into five areas labeled East, West, North, South, and Center, as
indicated in the table below:
| GridBagLayout |
Arranges components in a table. This time, however, the cells can have different sizes,
and the number of rows and columns does not have to stay constant. In other words, the
first row could have three columns, the second one two, and the last row four.
| CardLayout |
Layout manager that can switch between different layouts. This is used to give a user
different choices based on a selection they make.
GridBagLayout and CardLayout are the most difficult ones. We will first focus on the
first three, where we have already seens an example of the FlowLayout.
Let's redesign our 'summation' program to use a GridLayout:
import java.awt.*;

public class TestFrame extends Frame
{
   Button    Quit = new Button("Quit");
   Button    Add= new Button("Add");
   Button    Reset = new Button("Reset");
   Label     Number = new Label("Number:");
   TextField Output = new TextField(6);
   TextField Input  = new TextField(6);

   int Sum = 0;

   public TestFrame(String title)
   {
      super(title);
      setLayout(new GridLayout(2,3));
      add(Number);  add(Input); add(Output);
      add(Add);     add(Reset); add(Quit);
      validate();
      pack();
      show();
   }

   public boolean action(Event e, Object arg)
   {
      if (e.target == Quit)
      {
         hide();
         dispose();
         System.exit(0);
         return true;
      }
      else if (e.target == Add)
      {
         String toAdd = Input.getText();
         Sum += Integer.parseInt(toAdd);
         Output.setText(String.valueOf(Sum));
         return true;
      }
      else if (e.target == Reset)
      {
         Sum = 0;
         Output.setText("0");
         return true;
      }
      else
         return false;
   }
}
This looks somewhat nicer, but it's not quite right. So, we could try to use
another layout manager, but for example the BorderLayout will not be right, since we have
six components, and they don't seem to follow the 'North-South' etc. pattern.
Fortunatelly, we can mix different layouts together by creating panels.
Panels can be used to group several components together, using possibly a seperate
layout manager for each panel. Then the panels, in turn, can be laid out in the frame
using whichever layout manager you want. Together with panels, we can create a nice
looking program. Here is a much better looking version of our 'summation' program.
import java.awt.*;

public class TestFrame extends Frame
{
   Button    Quit  = new Button("Quit");
   Button    Add   = new Button("Add");
   Button    Reset = new Button("Reset");

   Label     AddLabel = new Label("Add:");
   Label     SumLabel = new Label("Sum:");

   TextField Output = new TextField(6);
   TextField Input  = new TextField(6);

   int Sum = 0;

   public TestFrame(String title)
   {
      super(title);
      Panel InputOutput = new Panel();
      InputOutput.setLayout(new GridLayout(2,2));
      InputOutput.add(AddLabel);   InputOutput.add(Input);
      InputOutput.add(SumLabel);   InputOutput.add(Output);

      Panel ButtonBar = new Panel();
      ButtonBar.setLayout(new FlowLayout());
      ButtonBar.add(Add); ButtonBar.add(Reset); ButtonBar.add(Quit);

      setLayout(new BorderLayout());
      add("Center", InputOutput);
      add("South",  ButtonBar);

      validate();
      pack();
      show();
   }

   public boolean action(Event e, Object arg)
   {
      if (e.target == Quit)
      {
         hide();
         dispose();
         System.exit(0);
         return true;
      }
      else if (e.target == Add)
      {
         String toAdd = Input.getText();
         Sum += Integer.parseInt(toAdd);
         Output.setText(String.valueOf(Sum));
         return true;
      }
      else if (e.target == Reset)
      {
         Sum = 0;
         Output.setText("0");
         return true;
      }
      else
         return false;
   }
}
We'll look a little more thoroughly into layout managers and panels in the next
lecture. We'll also start creating Applets soon, and see how to easly turn a stand-along
program into a web-enabled applet and vica versa.

(bgw)