Introduction to Microscopy
In his exercise you will begin to learn how to use a light microscope, and you will see examples of the great variety of cells. Some cells that you will see are parts of larger, more complex organisms: muscle cells, pine cells, for example. In other cases an individual cell is a complete organism: bacteria and protozoans, for example. Study of biology at the cellular level requires special effort and concentration because cells are too small to be seen with the naked eye. The naked eye can see objects down to about 0.1 mm (= 100 micrometer). That is about the diameter of the spherical human egg cell, which is a relatively large cell. Most cell types are smaller than that, and organelles (nucleus, mitochondria, e.g.) within cells certainly are smaller. The smallest cells, various bacteria, are no more than a few micrometers. The microscope is one tool used to study cells. Since the compound microscope can magnify 1000 times, it extends your observational limit down to about 0.1 micrometer (= 100 nanometers). Later you will see how models, chemical procedures, analytical instruments, and mathematical techniques can be used to "see" what is not visible to the naked eye. You will see the differences between a compound microscope and a dissecting microscope in the lab. Though both use ordinary visible light, they have different capabilities. Most of your work today will be with the compound microscope.
Though most people in this course have used a microscope before, few know how to use one properly now, for various reasons. (1) Something learned but not used regularly tends to be forgotten. (2) More important, effective use of a microscope is a skill that takes time to develop; and much practice is required to sharpen observational skill.
In PART A and PART B, your lab instructor (TA) will explain the proper use, parts, care, and handling of your compound microscope. Listen carefully and ask questions if something isn't clear. You are responsible for treating the instrument properly. It is delicate and must be handled and used with care (a) to avoid damaging it and (b) so that you are able to see with it what you need to see. If it isn't kept clean and used correctly, you'll miss seeing things and you'll misinterpret what you see- and that may cost points on an exam. Boldface terms in PARTS A and B are microscope parts and related vocabulary that you must know. Throughout the work keep the following in mind.
1. Keep the lenses free of dust, fingerprints, lint, eyelash oil, and other extraneous matter. Such things will interfere with your observations and possibly confuse you. To clean lenses use only the lens paper provided. Use this lens paper also to clean the prepared microscope slides, before you study them, so that you can see what you're supposed to see.
2. As you study specimens (the already-prepared slides and the ones you make yourself), STUDY them. Sharpen your power of observation. Take notes. You won't learn much in lab or remember much later if you just "look at" the slide material. The lab exam will include this material.
3. Estimate sizes of the objects you see. You have a calibrated ocular micrometer, in the right eyepiece for that. Be sure that you understand how it is calibrated and how to use it (more below).
4. A microscope magnifies, of course; but attention must be paid to resolution and contrast to make the most of the microscope's ability to magnify. Resolution (resolving power of the microscope) refers to the ability to distinguish two objects as separate from each other, to sharpen detail. If close enough and if fuzzy at the edges, they might appear to be a single object. For present purposes, you will maximize resolution by proper adjustment of the microscope's condenser and diaphragm as described below. Contrast refers to how well an object stands out against its background. Black against white is high contrast; pale grey against white is low contrast; higher contrast improves observation. If lamp intensity is too high, glare reduces contrast; too much light may "wash out" the object of interest. Contrast may be improved also by staining specimens, since the background is usually colorless water.
5. Some people who wear eyeglasses may prefer to remove them for microscope work, since the eyeglasses may feel awkward, getting in the way as one tries to peer into the microscope's eyepieces. Be aware that the microscope's optics will correct for nearsightedness and farsightedness but not for astigmatism. The individual needs to decide what is comfortable.
After the TA has finished with PART A and PART B, you will follow the rest of this guidesheet's instructions to study the specified material at your own pace.
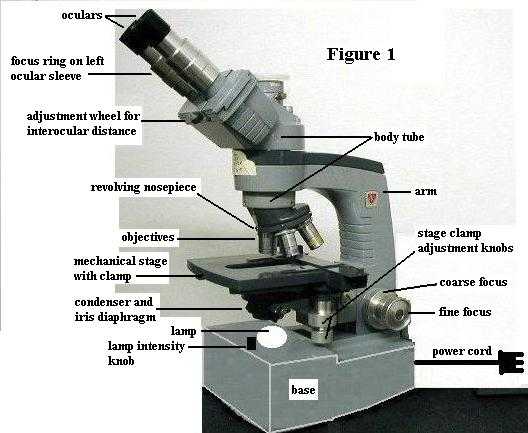
PART A. Compound microscope parts and their functions. As you follow the TA's instructions now, refer to the attached Figure 1, which shows a microscope similar to the one you will use.
1. When carrying the microscope between your workbench and the storage cabinet, always hold it by the arm with one hand and support it beneath the base with the other hand.
2. Remove the dust cover from the microscope. Then unwrap the power cord and plug it in the electrical outlet.
3. The lamp (= illuminator, light source) is built into the base. See Figure 1. Use the lamp intensity knob to turn on the lamp now. Note that turning the same knob increases/decreases lamp intensity. Whenever you need to adjust the lighting, use the lamp intensity knob. Clean the lamp surface with lens paper.
4. Ocular (= eyepiece). See Figure 1. Your microscope is binocular (has 2 eyepieces); they magnify 10 times (10X). Since only gravity holds them in place within their sleeves, never turn the microscope scope upside down. Also, to keep dust out, never remove an ocular unless the TA OKs that.
Clean the ocular lenses with lens paper; use a circular motion with gentle pressure.
5. Interocular (= interpupillary) distance. It is important to adjust the distance between oculars for your eyes. Use the adjustment wheel between the oculars to adjust this distance. (See Figure 1) When you look through the microscope with both eyes open (with the lamp on, of course), you should see one circle of white light, which is called the field of view. Since this feature is adjustable, the person who squints to use only one eye shows that s/he doesn't know how to use the microscope properly; the instructor notices such things. So, make this adjustment now.
If your field of view is colored (reddish, blue, etc.) rather than white, tell the TA right away. That probably means that here is dried stain on an objective lens from a previous use that needs to be removed.
The left ocular has a pointer in it, for marking an object in case you need to ask the TA to look at something later. The right ocular contains an ocular micrometer, used for measuring objects; you'll come back to that later. Also, the left ocular sleeve has a focus ring around it. The TA will explain its use in PART B.
6. Body tube. See Figure 1. This "tube" contains mirrors or prisms that direct the light path upward to the oculars.
7. Objectives. See Figure 1. There are four, attached to the revolving nosepiece. Turning the nosepiece clicks each objective into position, properly aligned. Learn the name and magnification of each objective: scanning objective (4X, shortest barrel), low power objective (10X, barrel next longer than scanning objective), high power objective (45X, barrel next longer than low power objective), oil immersion objective (100X, longest barrel). These are the names you will be expected to remember. DO NOT USE THE 100X (OIL) OBJECTIVE TODAY. Using it requires immersion oil (which you don't have), and your work today does not require that much magnification. Since resolving power is different for each objective, the diaphragm needs to be adjusted, as specified below.
Clean the objective lenses with lens paper; use a circular motion, with gentle pressure. The 4X objective lens is recessed in its barrel, probably beyond reach of lens paper on your fingertip. If so, leave it be unless you see (looking through the microscope with that objective in position) that the field of view is dirty.
8. Focus knobs. See Figure 1. These are at the bottom of the arm. They raise and lower the nosepiece-objectives assembly, which serves to focus on the specimen on the stage. [In some microscope models, the focus knobs raise/lower the stage (with specimen) while the objectives remain stationary; but the result is the same: focusing is accomplished.] The larger diameter knob is the coarse (coArse, not coUrse) focus knob and the smaller diameter knob is the fine focus knob.
Click the scanning objective (shortest one) into position above the stage hole. Now turn the coarse focus knob about 1/2 turn to see that the objective's vertical movement is obvious. Next turn the fine focus knob about 1/2 turn and note that the objective's vertical movement is so slight that you don't see it; it's much less than with the coarse focus knob.
This amount of movement when using the coarse focus knob creates a risk of crushing the longer objectives against a microscope slide on the stage, because those objectives are very close to the slide during viewing. For this reason the coarse focus knob must not be used when the high power objective or oil immersion objective is being used.
9. Stage. See Figure 1. This is the platform on which the specimen is mounted (on a glass slide) over the hole in the stage. This is a mechanical stage. That is, attached on top is a clasp (for holding the microscope slide) that can be moved left/right and forward/back by turning the two knobs that extend down beneath the side edge of the stage. This gives you good control for moving the specimen as you observe it through the microscope.
10. The iris diaphragm and condenser are connected as a unit beneath the stage. See Figure 1. The condenser, which is the larger (more obvious) of the two, is a thick glass lens that focuses light from the lamp beneath onto the specimen on the stage. The iris diaphragm is much thinner, not glass, and has a projecting stick-like handle attached to it. Note its location just below the condenser. If you lean your head low to one side of the microscope and look under the condenser, you can see the overlapping metal plates of the iris open and close as you move the protruding handle.
Raise the condenser/diaphragm assembly as high as it will go, by turning the knob located at its side (side opposite the stage clamp controls). For the work we will do, leave the condenser in this position, when using any objective. DON'T move it to adjust the lighting; use the lamp intensity knob to adjust lighting (brighter/dimmer).
For proper use in critical work, in order to get the best resolution and contrast, the iris diaphragm should be adjusted each time you switch from one objective to another. However, that adjustment requires removing an eyepiece, which we won't do. So, for our needs, note that there is a tiny dot of white paint on the front of the condenser assembly. Move the diaphragm lever to match that white dot, and leave it there. DON'T use the diaphragm lever to adjust the lighting; use the lamp intensity knob to adjust lighting (brighter/dimmer).
PART B. Procedure for studying a specimen on a slide You're ready now to use a specimen to learn the proper procedure for making observations. Follow the TA's instructions; s/he will give you a microscope slide on which is mounted a small letter "e" to perform the following steps.
1. Make sure that the scanning objective (4X) is snapped in position above the stage hole and raised (coarse focus knob) as high as it will go (away from the stage). When mounting or removing slides from the clamp you want room to work, to avoid scraping slides against objectives. [[NOTE WELL: In the future, though there will be cases where the scanning objective is the best one to start with, for most routine work it will be OK to start (with a new specimen) with the low power objective. But one should never start with the high power objective. There's a risk of damaging slide and objective, and there's a risk of missing important observations that would be seen at low power.]] Right now we're learning how to do things right, not short cuts.
2. Use lens paper to clean the slide. Then hold the slide with the label at the left and observe (with naked eye) that the "e" is upside down.
3. Place the slide securely in the clamp on the stage. Use the stage clamp adjustment knobs to position the "e" over the center of the hole in the stage.
4. With the coarse focus knob, lower the scanning objective as far down as it will go...to its safety stop position. It won't hit the slide.
5. As you look through the oculars, slowly raise (use coarse focus knob) the objective until the "e" comes into view. Center the "e" in the field of view. Then sharpen the focus (coarse focus, then fine focus). With this objective the total magnification is 40X (i.e. objective mag. X ocular mag.)
6. Focusable sleeve. See Figure 1. With your right eye only (left eye closed), use the fine focus knob to focus sharply on an edge of the "e." Then close the right eye and look with the left eye only. Now use the focus ring on the left ocular sleeve to sharpen the focus on the same spot on the "e," looking only with your left eye. With this done, look at the letter "e" with both eyes. The image is now in focus with both eyes. This adjustment needs to be done only once, at the start of work, and is important for effective use of the scope and to avoid eyestrain.
7. Note that the "e" is now turned upright and facing
forward. The compound microscope inverts and reverses the
image, the same effect as rotating the original image 180 degrees.
Inversion and reversal do not mean the same thing.
|
|
|
|
|
8. Working distance is the distance between the top surface
of the cover slip on the microscope slide (bearing the specimen)
and the tip of the objective. See how large it is now with the 4X
objective in place. Watch how it changes with the other objectives.
9. With the "e" centered in the field of view, switch to the low power objective (10X), and sharpen the focus if necessary. Note the change in magnification (it's now 100X; again, it's objective mag. X ocular mag.) and the distinctly rough edge of the "e." The higher magnification doesn't just enlarge the image; it reveals more detail.
10. You may have noticed also the field of view is dimmer than with the 4X objective. Brightness of the field of view is inversely related to magnification. Adjust the lamp intensity if necessary.
Note that the working distance is less with the 10X objective, which is longer than the 4X objective. Working distance is inversely related to magnification.
11. Move the slide to put an edge of the "e" in the center of the field of view. Then carefully switch to the high power objective (45X). DO NOT USE THE COARSE FOCUS KNOB NOW...only the fine focus knob.
Working distance is now less than with the 10X objective, very small now in fact. Turning the coarse focus knob the wrong way may jam the objective into the slide, damaging both. So, use the coarse focus knob only with low power and scanning objectives. Later you will see prepared slides that have cover slips cracked by someone who used the coarse adjustment with the high power objective. You can be sure that every one of those people who cracked a cover slip claimed to already know how to use the microscope properly.
12. Note the change in magnification (total magnification = 450X now) and in field brightness (adjust lamp intensity) when you switched from 10X objective to 45X objective. This increase in magnification means that the diameter of the field of view decreases as you increase magnification; that is, they are inversely related.
13. Now that you have finished with this slide: (a) rotate the high power objective out of position, (b) click the low power objective into position, (c) and then raise the objectives (use coarse focus knob) away from the stage. THEN remove the slide from the stage clamp. This eliminates the chance of damaging the slide or high power objective accidentally. Never try to remove a slide from the stage while the high power objective or oil immersion objective is in the viewing position.
The TA will collect the letter "e" slides.
Summary of procedure: Since you don't know what the last person
who used the microscope did, before you can begin work in your session you need
to adjust the condenser, diaphragm, interocular
distance, and focusable ocular sleeve as described above. Then, for each
specimen to be studied:
1. Start with scanning or low power objective in place, with the
objective raised well above the stage (so there's ample working distance).
2. Mount the slide in the clamp on the stage.
3. Lower the objective to its safety stop position above the slide.
4. Look through the oculars and raise the objective to focus image,
using the coarse focus knob.
5. If more mag. is needed (beyond low
power 10X), rotate the high power objective into position. USE ONLY FINE
FOCUS KNOB NOW.
6. Adjust lamp intensity as needed; reposition specimen as needed, using
the stage clamp controls.
7. After observations, swing the high power objective out of position and
then raise it away from the stage.
8. Remove the slide from the stage clamp. Clean the stage if
necessary.
PART C. Study the specimens
described below at your own pace. Take notes; you'll see this again on a
lab exam. Materials you'll use are:
|
box of microscope slides (bench) |
onion and forceps (front of room) |
|
box of plastic cover slips (bench) |
dropper bottle of methylene blue stain (bench) |
|
lens paper (bench)- for cleaning slides & lenses |
dropper bottle of 5% sucrose solution (bench) |
|
kimwipes (bench)- for cleaning drips, NOT lenses |
dropper bottle of Janus green stain (bench) |
|
slide of colored threads (ask TA) |
dropper bottle of 5% salt solution (bench) |
|
6-inch transparent plastic ruler (bench) |
blood cell charts (posted, front or side of room) |
|
cellophane tape (bench) |
cell type illustrations (posted, front or side of room) |
|
dropper bottle of water (bench) |
fine-tip forceps (bench) |
|
flat toothpicks (front of room) |
razor blade (bench) |
About "glass trash" - After studying each slide that you prepare (onion, cheek cells, e.g.), discard the slide in the large box marked for glass disposal. Glass waste must not go into the regular trash. Plastic cover slips can go into the regular trash container; we don't reuse them.When you come to the professionally prepared slides in the blue boxes, those must returned to the blue boxes, not discarded.
1. Depth of field(= depth of focus)
a. Get one of the slides (from the silver tray; ask TA) that has three
overlapping colored threads glued on it.
b. Start as before with 4X objective.
c. Mount the slide on the stage and bring into focus the point where the
threads overlap. Note that each thread is actually a bundle of smaller fibers.
d. Focus first on the uppermost fiber of the top thread (which color is
that?). Note that the two lower threads are not in sharp focus like the
top one. You're focusing on a thin slice of space shaped like a coin,
circular and thin; anything above or below that slice is out of focus.
e. Switch to the low power (10X) objective. Refocus on the uppermost
fiber of the top thread. Now the lower threads are much more out of focus than
before. The slice of space that you're focused on now is thinner.
f. Switch to high power and refocus, again, on the
point where the three overlap; use fine focus knob only. Now
the top thread alone almost fills the field of view. The slice of space
in focus now is much thinner. Even within the top thread
alone, the bottom of that one thread is out of focus when the top of the thread
is in focus.
This slice of space that is in focus is the depth of field (= depth of focus). At high magnification a small turn of the fine adjustment knob loses the focus, but at low magnification that same small turn of the knob does not lose the focus (or at least not as much so). Depth of field is inversely related to magnification; i.e. as you increase magnification, the depth of focus decreases. Return the slide to its tray when you're done.
2. Measurement of specimens.
a. One way to estimate the size of an object seen through a microscope is to compare its size to the size of the field of view. As you've already seen in observing the "e" slide, the diameter of the field of view is different for each objective (gets smaller as magnification increases). If one knows the diameter of the field of view, then at least some approximation of sizes of objects can be done.
(1) Get a 6" (about 15 cm) transparent plastic ruler. Swivel the 4X objective into place, lay the ruler over the hole in the stage, and focus on the METRIC divisions. Estimate the diameter of the field of view. Notice the roughness of the edges of the black lines that look smooth to the naked eye.
(2) Next swivel the 10X objective into place and measure (estimate) the diameter of this field of view with the ruler. Obviously these estimates are crude. Don't try to use the ruler with the 45X objective; you may scratch the lens. This ruler has very limited usefulness for measuring field diameter.
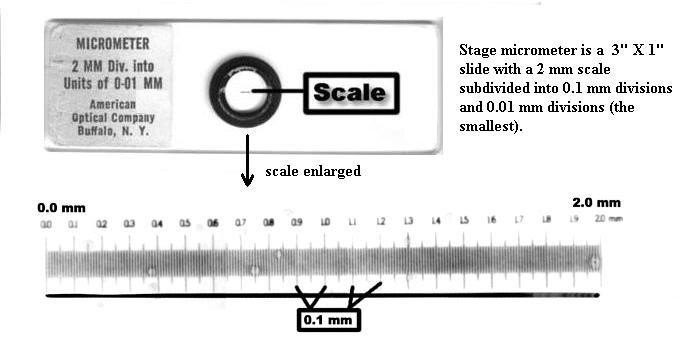
b. Another way, a much more accurate way, to estimate field diameters is with a stage micrometer, shown below. The whole ruler line under the circular cover slip ("scale", below) is 2 mm long, with 0.1 mm large divisions and 0.01 mm (= 10 micrometers) small divisions. Using such a tool, the field diameters of your microscope have been measured as approximately 3.75 mm (4X obj.), 1.74 mm (10X obj.), 0.40 mm (45X obj.), and 0.17 mm (100X obj.).You're expected to remember these values.
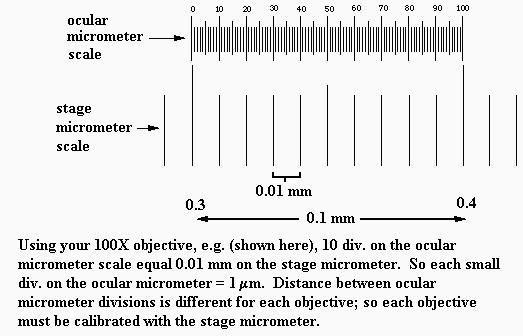
c. For measuring objects within the field of view, one uses an ocular micrometer. There's one inside your microscope's right ocular. It looks like a small ruler (see drawing below). NOTE: if it appears that the micrometer disc (glass circle) is tilted in the eyepiece, ask your TA for help with this; it needs to lie flat. Since the diameter of the field of view is different for each objective, the spacings of the ocular micrometer divisions will be different for each objective. Therefore, the ocular micrometer divisions must be calibrated for use with each objective. That is done with the stage micrometer, shown above.
For each objective, the ocular micrometer is lined up against the stage micrometer to determine the spacings on the ocular micrometer, as shown below. Rather than take the time now for each person to calibrate the ocular micrometer, there is a demonstration microscope in the lab that has a stage micrometer and an ocular micrometer mounted in it; be sure you see this today and understand how it's used. For your microscope the ocular micrometer spacings are: 21 micrometers per division with 4X objective, 10 micrometers per division with 10X objective, 2.2 micrometers per division with 45X objective, 1.0 micrometer per division with 100X objective. It is important that you understand how measurements can be made with the calibrated ocular micrometer. And you should practice measuring objects with it.
d. Measuring things. Pluck a hair from your head or eyebrow and lay it on a clean microscope slide. Use a bit of transparent tape to stick it to the slide and trim away the excess hair shaft (use razor blade). Use these ocular micrometer values to measue the width of the hair shaft. When done, discard the slide in the glass trash.
e. Measuring things. Get one of the slides from the box labeled "Typeface." On that slide is a strip of paper bearing several sizes of the period punctuation mark in Times New Roman font. Mount the slide on your microscope's stage for observation; enough light will pass through the paper for you to easily see the periods of different sizes. With your 10X objective, use your calibrated ocular micrometer to measure the diameter of each period. Record the sizes. Then plot period size as a function of font size on a piece of linear graph paper: i.e. micrometers on the y-axis and font size on the x-axis. Which is the independent variable and which is the dependent variable here? Does the relationship appear to be linear or logarithmic? This difference between linear and logarithmic was covered in the "Construction of Graphs" guidesheet from the first lab session. Return the slide to the box when done.
In Part D.2.below you can use the calibrated ocular micrometer to measure the diameter of blood cells.
3. Contrast and staining. Handle all stains carefully to avoid staining skin, clothing, books, etc. Wear the disposable gloves that are provided.
When mounted in water for observation, many cell types are not easily seen unless a stain (dye) is used to improve the contrast of the specimen (i.e. make it stand out against the surrounding liquid on the slide). Aside from improving overall contrast for observation, the other common use for stains in microscope work is to selectively stain one or more specific structures.
a. Making a wet mount of your cheek epithelial cells. The inside lining of your cheek is made of squamous (flattened) epithelial cells, which are continuously being sloughed off (like your skin outer layer). Put a small drop of water (from the water dropper bottle) in the center of a microscope slide. Use a flat, blunt-end toothpick to gently scrape the cheek lining inside your mouth. Then swirl the toothpick end in the drop of water on the slide to dislodge the cells in the water. [Discard the toothpick in the trash; don't reuse it or give to anyone else.] Apply a cover slip. This is what's called a wet mount. Look for the cells with low power and then high power. Since these unstained cells have low contrast, you may need to lower the light intensity in order to see them. Try to locate the nucleus within the cell. Look at text page 57, top left illustration. These cells have a "fried egg" appearance, with the nucleus being the "yolk." When done, discard the slide in the glass trash.
With a new toothpick and another slide, make another wet mount of your cheek cells. BUT, this time combine a small drop of water and a small drop of methylene blue stain on the slide and swirl the toothpick end in that. Again, look for the cells with low power and then high power. This stain binds to molecules that are negatively charged (various proteins, polysaccharides, DNA, and RNA, for example). So, the cell nucleus (containing DNA) will stain blue; the entire cell contents will stain a lighter blue due to the many proteins in the cell. The stain greatly improves the cell's contrast. Knowing what types of molecules that different stains bind to can also give some information about cell structures. Refer to the posted illustration of squamous (flat) epithelial cells. When done, discard the slide in the glass trash.
Tip: Experience shows that using too much liquid (water or stain) when making a wet mount can result in "jiggling" of the specimen, which makes observation difficult. You want enough liquid to fill the space between slide and cover slip but not so much that the liquid would run if you tilted the slide. Practice shows when you've got it right.
b. Staining onion cells. Repeat the preparation of unstained (one slide, water only), and then stained (another slide, water plus methylene blue), wet mounts of onion epidermal cells. To do so, get a small (1/2 inch by 1/2 inch) piece of an onion and fold it to "crack" the layers of tissue. Then use forceps to tease away a bit of the very thin epidermal tissue (so-called onion "skin"). Mount that in the water, and then water + stain, being careful not to let the thin tissue fold over on itself. Observe each slide at low and high power.
Look for the nucleus in each cell and note the staining of the cell wall at the border of each cell. Animal cells lack this polysaccharide-based, rigid cell wall. The nucleus in some cells appears to be shoved against a wall. Picture the cell as a 3D box; most of the interior is occupied by a storage vacuole (which animal cells also lack) that restricts the nucleus and other structures in the cytoplasm to the edges of the cell interior. Refer to the illustrations on pp. 68-69 in your textbook for a comparison of typical features of plant cells and animal cells. When done, discard these two slides in the glass trash.
c. Seeing membranes? Though all cellular membranes are too thin (about 7-8 nanometers) to be seen directly with a light microscope, their location may be inferred if the solutions on opposite sides of a membrane have sufficiently different contrast. The onion cell and cheek cell nuclei that you saw took up the methylene blue stain more than did the surrounding cytoplasm; so the dark blue/light blue contrast revealed the presence of a boundary (edge), which is where the nuclear membrane is. And in the case of the squamous epithelial cells, the slight difference in contrast between the cell's cytoplasm and the external liquid showed where the plasma membrane is located.
Make a wet mount of onion epidermis again, but use 5% salt solution (no stain) instead of water on the microscope slide. Apply a cover slip and observe with low power and high power. Locate cells in which it appears that the entire contents have "shrunk away" from the cell wall. Because of the contrast difference between the cytoplasm and the salt solution, a boundary at the edge of the cytoplasm is detectable. That's the location of the plasma membrane. This effect of the salt solution is called plasmolysis. Since the salt solution has a greater solute concentration than the cytoplasm does (i.e. a lower water concentration than the cytoplasm), water moves out of the cell by passive movement, thereby decreasing the cell volume. The rigidity of the cell wall holds it in place. See text pg. 96, Fig. 5.8b. Lecture covers such water relations of cells.
d. Staining onion mitochondria. Put four small drops of the Janus green stain on a slide and add one small drop of the 5% sucrose solution; mix with a toothpick. Place a bit of onion epidermis in the liquid and apply a cover slip. Avoid folding the tissue over on itself. Observe with low power and then high power. Look for tiny (much smaller than the nucleus) bluish oblong bodies in the cytoplasm of cells. There may be few or many per cell. These are mitochondria (singular = mitochondrion), organelles that generate most of the cell's energy. After finding them, watch for a few minutes; the bluish color will disappear as the chemical activity within the mitochondria converts the stain (dye) to a colorless form. That change shows that the mitochondria are actively engaged in cellular respiration to produce ATP energy.
Keep in mind that the more time you spend using the microscope, the better your observational skill becomes. We all need practice.
PART D. Study of cell variety: professionally prepared slides. Study the specimens on prepared slides described below, at your own pace. Take notes; you'll see some of this again on a lab exam. The prepared slides are in blue slide boxes or on trays at the front and side of the room. Return each slide to its labeled box when done. Use lens paper to clean each slide before observation.
Note that the specimens on these professionally prepared slides have been stained to highlight particular features; so you're not looking at natural colors. It's a good idea to view more than one slide of a kind, since a single slide may not show all important features equally well. Reminder: don't use the 100X objective (longest barrel) and don't use the coarse focus knob with the 45X objective (high power); the likelihood of cracking the cover slips and damaging the objective lens surface is too great.
1. Bacteria. All other cell types you study today are eukaryotic cells, i.e. cells whose contents are extensively subdivided into compartments by membranes. Prokaryotic cells, in contrast, do not have this internal membranous organization. Prokaryotic cells are less complex and more primitive (from an evolutionary perspective) than eukaryotic cells. Bacteria are prokaryotes (prokaryotic cells). Animals, plants, fungi, protozoans, algae areeukaryotes (made up of eukaryotic cells). See text chapter 4 for prokaryote-eukaryote comparison and for eukaryotic cell structural details.
Study the prepared slide marked "bacterial types". Three different bacterial cell shapes are displayed on the slide: spherical (coccus, plural cocci), rod shaped (bacillus, plural bacilli), and spiral or wavy (spirillum, plural spirilla). Each type is stained a different color. See text page 461, Fig 27.3 and the posted illustration for these typical shapes. Start with the 10X objective to locate the colored patches of cells, and then switch to the 45X objective. Individual cells still appear very small, typically little more than 1-5 micrometers long and wide. Reminder: don't use the 100X objective; you won't see any more detail here. The point is for you to see the shapes of these cells and how small these prokaryotic cells are compared to the various eukaryotic cells that you see today. The cells of the bacillus species on the slide are attached to each other end-to-end; in other bacillus species the cells may be separate. Depending on the species, cells of the coccus type may be single, in chains, or variously clustered. Return this slide to its tray when done. Bacteria are important in many ways: e. g. as decomposers in Nature, as producers of some antibiotics, and as causal agents of many diseases ("staph" infections, strep throat, bubonic plague, diphtheria, gonorrhea, anthrax, etc.)
2. Human blood cells. Study the normal human blood smear slide first so that you will be able to recognize abnormalities in the blood smears representing various illnesses. With the normal smear, refer to (a) the set of blood cell drawings below, (b) the blood cell development charts posted in the lab, and (c) the blood cell illustrations on text pages 366 and 954. Look for the red blood cells (= erythrocytes), different types of white blood cells (= leukocytes), and the smaller platelets (= thrombocytes, which actually are cell fragments rather than complete cells). Note the relative shapes, sizes, and numbers of these in the smear. Look also for differences in size and shape of the leukocyte nucleus (absent in mature red cells) and whether the leukocyte interior appears granular.
Be aware that all of these cells have been stained as you see them here; leukocyte nuclei appear purple; the mature erythrocyte lacks a nucleus and is slightly less pink in the thinner central zone. Erythrocytes differ from other eukaryotic cells in that they lose their nucleus and mitochondria as they mature; so you'll see no organelles in the RBC, no purple-stained bodies. Unstained "white" blood cells are actually colorless, not "white." Return the slide to its box when done.
Normal blood cells (drawings, panel below). The erythrocyte (red blood cell)
is 7-8 micrometers in diameter and about 2 micrometers thick at the edge.
Leukocytes (white blood cells) are 10 - 18 micrometers in diameter, depending
on the type. Platelets are 1 - 4 micrometers in diameter. Use your
calibrated ocular micrometer to confirm these cell sizes.
|
|
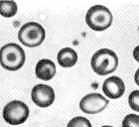
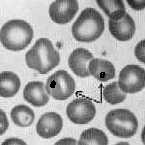
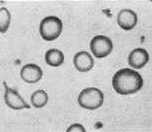
Study the abnormal smears, blood samples taken from individuals suffering various illnesses: (1) sickle cell anemia, (2) iron deficiency anemia, (3) acute granulocytic leukemia. Compare each with what you saw in the normal smear. There are several differences, though not all show equally well on a single slide: e.g. more or fewer of one cell type, abnormally shaped cells, abnormal red cell edges. A point worth noting here that is not obvious just from seeing the cells is that the red cells with abnormal (irregular) margins tend to be more fragile than normal erythrocytes. They will die sooner than normal ones, leading to low red cell numbers (which is called anemia).
In sickle cell anemia look for: (1) sickle shaped (and otherwise abnormally shaped) red cells, (2) target cells and Howell-Jolly bodies in red cells (see illustrations below), (3) red cells with wavy margins, (4) slight increase in platelet number. Return the slide to its box when done.
In iron deficiency anemia look for: (1) aggregation of red cells, i.e. sticking together, (2) red cells smaller and more variable in shape, (3) increased platelet number, (4) hypochromia of many red cells (see illustration below). Return the slide to its box when done.
In acute granulocytic leukemia look for: (1) increased white blood
cell number and different proportion of types, (2) decreased platelet number,
(3) red cells variable in shape and size, (4) red cells with abnomal margins. Return the slide to its box when
done.
|
|
"target cells" (RBC with dark center) |
Howell-Jolly bodies within red cells (arrows) |
hypochromia (RBC with enlarged pale center) |
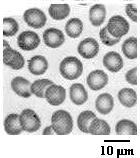
3. Scale and magnification in micrographs. A "micrograph" is a photo taken through a microscope. Look at the micrograph of the normal erythrocytes above, left panel. It shows two ways of expressing the size of the objects: a scale bar and a magnification value. A micrograph should always show one or the other of these so that the observer will be able to determine the size of the object(s) shown. Keeping in mind that your screen and print settings may vary, use your metric ruler to measure the diameter of the normal RBCs above. Since they vary a bit, measure several and take the average as representative: 6 mm, for example. From your dimensional analysis work in lab session #1, you know that 6 mm = 6000 micrometers. The X750 says that this image is 750 times larger that the actual size. Then 6000 micrometers divided by 750 = 8 micrometers, which is the diameter of the typical RBC. Or, if you knew beforehand that the RBC is 8 micrometers in diameter, then 6000 micrometers (as you measure the cells on the screen or printed page) divided by 8 micrometers is 750, which is the magnification value. Note that the magnification value (750 for this particular photo) has no units. If you didn't know the cell size, you would use the scale bar that is shown to estimate cell size in the photo.
4. Other animal cells. You will see cells in greater detail and variety in future courses. For now it is useful to see a few types to show variety in size, shape, and appearance. Like the blood cells you saw, these also have been stained (artificial colors) to highlight structure. Some of these will come up in the lecture discussion later.
Neuron. Compare the slide image with the posted photo of "typical" neurons; see also other neuron shapes on text page 846. Some glial cells, which metabolically support neurons, may also be seen on the slide. Locate the neuron's large cell body, with prominent nucleus, and the extensions (called dendrites and axons) from the cell body. Return the slide to its box when done.
Skeletal (striated) muscle cells and smooth muscle cells. Note the different shapes and appearance of these two cell types (see text pg. 905 and the posted illustrations). The smooth muscle cells are teased apart on the slide, to show the long tapered shape, prominent nucleus, and absence of striations (lines). In contrast, in skeletal muscle cells you can see striations and the nuclei clearly. To get the perspective on these striations it will help to refer to text pg.907 and the posted illustrations. Some cells on the slide are seen cut in cross section (perpendicular to the long axis). Return the slide to its box when done.
Simple cuboidal epithelium. A posted illustration shows the typical "cube" shape. See also text pg. 738, Fig. 41.3a. Like squamous and columnar types, cuboidal epithelium may be simple (only one layer) or stratified (2 or more layers). On the slide note the cuboidal shape and prominent nucleus in each cell. Compare the shape of these with the squamous (flattened) epithelial cells from your cheek lining. Return the slide to its box when done.
Simple columnar epithelium. The slide shows a cross sectional cut of small intestine, one that is very small in diameter, similar to that shown on the posted illustration in the lab and on text pg. 971, Fig. 50.9c. Locate the infoldings of the intestine and thevilli (singular villus). The epithelial cells forming the surface of the villi are columnar (= shaped like a column). This is called a simple epithelium because it has only one layer of epithelial cells. Refer again to the sheet of drawings posted in the lab to be sure you understand where these cells are in the small intestinal lining. In this thin section of intestine on the slide there are several other cell types as well; your focus right now is just the columnar epithelium. Return the slide to its box when done.
5. Pine cells. Unlike animal cells plant cells have a thick (more or less), rigid cell wall made largely of cellulose molecules (see text pgs. 68-69 for comparison). You've already seen onion epidermal cells. Now look at the cross sectional view of the pine stem on the slide. Most of this wood is made up of more or less squarish, thick walled cells called tracheids. Refer to the posted illustration sheet to orient yourself in this view. Tracheids are the major water-conducting and support cells of the pine stem. They are long and tapered, overlapping each other as shown on the posted illustration sheet. If you teased pine wood apart, you would see these cells as they are revealed on the prepared slide that is labeled "pine tracheids". Close inspection of the cells shows the pits through which water passes from cell to cell where they overlap. Return the slide to its box when done.
PART E. There are two models of dissecting microscopes set up for demonstration, one older model and one newer model. Though you won't have much use for this type of microscope in this course, you will in other courses. So, it's important that you understand the differences between this and the compound microscope. Look at each of the dissecting microscopes.
1. The dissecting microscope is binocular and you can adjust the interocular distance (though there's no thumbwheel for
that; simply move the eyepiece barrels gently with your hands).
2. There's only one objective, but there's a "zoom" knob near the
eyepieces (or a ring on the body tube, depending on microscope model) that
permits changing magnification. Even so, the dissecting microscope allows
only modest magnification compared to the compound microscope.
3. Unlike the compound microscope, the dissecting microscope allows for
manipulation of large specimens on the stage as you look through the
oculars. That is, the working distance of the dissecting microscope is
very large compared to that of the compound microscope. Studying a specimen
with the dissecting microscope, at low magnifications, often is followed by
preparing slides for subsequent study with the compound microscope, at higher
magnifications.
4. The lamp may be built in or separate, depending on the model. In
either case, it's possible to light the specimen from above or from
below. Illumination with the compound microscope is only from below the
specimen.
5. Does the dissecting microscope invert and reverse the image as the compound
microscope does? Look closely at the metric ruler on the stage of the
dissecting microscope.
CLEANUP Prepare your compound microscope for storage, as follows:
1. Put the scanning objective in position over the stage hole.
2. Raise the objectives away from the stage, as high as possible.
3. Use lens paper to clean the oculars, objectives, and condenser.
4. Wipe the stage clean if necessary. And never leave a slide on
the stage.
5. Turn off the lamp.
6. Wrap the power cord around the bottom of the arm, under the stage, not
around the oculars.
7. Put on the dust cover.
8. Return the microscope to its numbered slot in
the cabinet, unless your TA instructs otherwise.
return from Figure 1: use BACK button