[Be sure to print the Experimental Setup Table also; you must have it to do the exercise.]
In the previous lab exercise you learned (a) how the Spectronic 20 colorimeter works, (b) how to standardize the colorimeter and why that is necessary, (c) how to determine an absorption spectrum for an organic substance. In that activity you saw that riboflavin absorbs some wavelengths more strongly than others. That is true of other organic molecules too. Now you will see how the colorimeter can be used to measure the concentration of a substance in solution. Just as riboflavin was used before to illustrate certain aspects of colorimetry, the protein called albumin will be used as the example now. Keep in mind that albumin is only one type of protein and that the procedure you will learn now can be modified for use in measuring concentrations of many types of organic molecules in solutions.
The many different types of organic molecules may be categorized on the basis of their properties. For example, simple carbohydrates have properties in common, as a group. Though there are many in that group, their chemical behaviors are similar in certain respects because the molecules are structurally similar. There are chemical tests that will distinguish simple carbohydrates from other types of molecules.
Likewise, other groups of organic molecules have their own distinctive characteristics, and they undergo chemical reactions that are distinctive for each group. Thus, fats, as a group, may be distinguished from amino acids, as a group, and from nucleic acids, as a group, and so on. This is a powerful insight that chemistry research has provided; our understanding of this has been put to countless uses in medicine, research, manufacturing processes, etc. Colorimetric procedures are routinely used for detecting and measuring a wide variety of substances in blood, urine, water samples, and other fluids of interest to biologists, chemists, doctors, and others. What you learn in this exercise and in the previous one has many applications, far beyond these exercises.
If a type of molecule has a distinctive color naturally, as riboflavin does, it may be analyzed colorimetrically as it is, without need for special treatment beforehand. However, most types of organic molecules are colorless in solution; therefore, in order to detect them and measure them in solutions, they must first be made "visible" to the colorimeter. That means subjecting the molecule of interest to some type of chemical reaction that causes the molecule to produce a color. As you will learn in your chemistry course work, there are chemical reactions that are distinctive for particular groups of molecules; such reactions have been used as the basis for development of chemical tests, i.e. lab procedures that are used for the detection and measurement of various types of molecules. There are chemical tests for simple carbohydrates, for proteins, for steroids, and so on. In many such tests, when the proper reagents are added to a solution that is to be tested, a characteristic color develops, indicating the presence of the suspected type of molecule. This is an example of a qualitative test, a test to determine whether the suspected molecule is present at all; other types of molecules don't react in the test.
A quantitative test is one that also reveals the concentration of the molecule of interest in the solution, not just whether the molecule is present, but how much. The small molecule called "biuret" (also known as carbamylurea) reacts with copper sulfate and NaOH (sodium hydroxide) in aqueous solution (aqueous = pertaining to water) to produce a purple color. The intensity of the color formed (i.e. "how much purple") depends on the concentration of biuret in the solution. The greater the biuret concentration, the deeper the purple. This concept was introduced in the previous exercise.
Although the molecule, biuret, itself, is of very little significance, there is a group of very important molecules, the proteins, which react with copper sulfate and NaOH the same way that biuret reacts. As your textbook tells you, proteins are made of many amino acids attached to each other by peptide bonds. Because the arrangement of atoms at every peptide bond is similar to part of the biuret molecule, peptide bonds within protein molecules react the same way biuret reacts. That means that proteins in solution give a positive biuret reaction, with the result that solutions containing proteins turn purple. Though there are many different kinds of proteins, they have about equal numbers of peptide bonds per unit mass, which means they behave similarly in this biuret test that you perform in this exercise. So, albumin is representative of proteins in general.
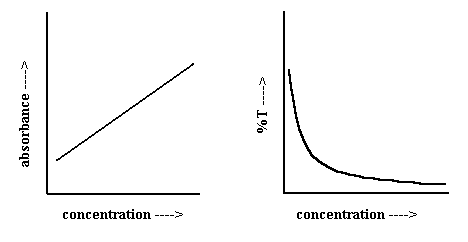
It is the Beer-Lambert relationship that makes colorimetric tests so useful for quantifying solutes such as proteins in solutions. The Beer-Lambert Law (relationship) says that there exists a concentration range within which there is a direct, linear (straight line) relationship between solute concentration and absorbance. As your previous lab guide sheet said, the Spectronic 20 will measure both the amount of light absorbed (the variable called absorbance, A) by the solution and the amount of light that the solution allows to pass through unabsorbed (the variable called percent transmittance, %T). As the figures below show, solute concentration and %T are not linearly related. Their relationship is: A = log (1 / T).
This linear relationship between solute concentration and absorbance is called a standard curve. To produce such a standard curve, you prepare a series of solutions of known protein concentration and measure the absorbance of each. That set of points would fall on a straight line if there were no error in your work. But since there is always some error, from various sources, the points won't be exactly linear. Therefore, you draw the line of best fit through the set of points; that is the standard curve. Why do that? Once you have the standard curve, you can compare absorbance of "unknown" protein solutions with the standard curve to determine the protein concentration of those "unknowns."
There are colorimetric tests for the detection and measurement of many groups of organic molecules: carbohydrates (various categories), amino acids, lipids, proteins, nucleic acids. The biuret test is just one colorimetric test among the many, and its use is for measuring concentration of proteins in solutions. However, by studying it thoroughly you will learn much about colorimetric analysis generally.
You will need this background and experience again in lab this semester and in future courses.
The background material ends here.
The work starts here.
In this exercise you will work with a lab partner to generate data. Divide the work so that both of you have the opportunity to learn all aspects of the procedure. You are responsible for understanding all of the material (theory, procedures, calculations, plotting of data).
If something isn't clear as you work, then before you ask for help try to find the answer or figure it out for yourself first by rereading the instructions and background information (here and in the previous lab guide). Trying to resolve problems yourself is an important part of the learning experience. If something still isn't clear, though, then of course you should ask for help; your TA will be glad to assist.
Here is a very brief outline of the steps involved:
a. You will set up a series of test tubes in which you will prepare a series of solutions that differ in protein concentration. You will use BSA, bovine serum albumin, which is protein extracted from cow's blood, as a representative protein today, but others could be used as well. BSA is the reference protein in this work.
b. When you add the biuret reagent solution (it happens to be blue) to protein solutions of known concentration, you will see different degrees of color development (shades of purple) - the greater the protein concentration, the deeper the purple color,
c. The Spectronic 20 instrument will give you numerical values that correspond to the amount of light absorbed by each of the solutions. That is, it will quantify the depth of color in each tube. You will record aborbance values and %T values for each solution.
d. You will then plot, on graph paper, absorbance versus concentration of albumin, which you calculate for each test tube's solution.
e. That set of data points, one point for each test tube, should approximate a straight line. You will then "fit the best straight line" to your set of points; that straight line is called a standard curve.
f. Then you will use the standard curve to estimate the concentration of two albumin "unknown" solutions.
MATERIALS:
Clear off a work space on the bench in front of you; move books, etc. to minimize chances of spilling things. Check to see that you have the following items.
A test tube rack
8 large test tubes (for preparing the test solutions)
2 colorimeter tubes (1 is a spare) - the small tubes to be used in
the Spectronic 20 colorimeter
A grease pencil for numbering the 8 test tubes
5 glass pipets (2 mL
capacity, 1/100 mL graduations) - one for
each solution to be dispensed
5 blue pipet pumps - one for each pipet
Bottle of 0.5M KCl solution
Bottle of (blue) biuret reagent solution-
Caution: contains caustic alkali, NaOH!
- handle carefully
Bottle of albumin stock solution, 2.5 mg/mL
Bottle of albumin unknown #1 solution
Bottle of albumin unknown #2 solution
Squeeze bottle of water and 1-quart RINSE cup: for rinsing the
colorimeter tube between measurements
Spectronic 20 colorimeter. You and your partner
have your own.
Box of kimwipes and some paper toweling
2 plastic rulers for plotting data
SOME POINTS ON TECHNIQUE:
Look at the Experimental Setup Table.
Be sure to print it and bring it to lab also. Refer to this table
for the volumes of the various solutions that you will put into the test
tubes. You will also use this table to help with your calculations and
to record your data.
1. Wear splash goggles and gloves.
2. If either end of a pipet is chipped, don't use it. Discard it in the glass trash and replace it. Likewise, don't use chipped test tubes; they are more likely to break.
3. Your TA will describe some points about preparation of solutions in the test tubes and the proper way to use the pipet pumps. Listen carefully; following instructions is essential in all lab work for safety and to ensure that the work goes as it should.
4. Using pipet pumps.
NEVERpipet any solution by mouth;
use a pipet pump instead. Alwaysbe
very careful fitting a glass pipet into
the pump so that you don't break the glass pipet
and risk cutting yourself. The basic procedure (the TA will illustrate):
a. With your writing hand, grasp
the pipet about 1/2 inch from its squared,
blunt end (not the tapered end). Holding the pipet
this close to the end reduces the probability of breaking the pipet.
b. Hold the blue pipet pump in
your other hand. Note that the white rubber collar at one end has
a tapered hole; that's where you will insert the end of the glass pipet.
c. Keep the pipet and the barrel
of the pump in the same straight line for the next step. This reduces the
probability of breaking the pipet.
d. Rotate the pipet slowly as
you push its blunt end into the tapered hole of the rubber collar of the
pump, until the pipet is snug against the
rubber.
When properly seated, the pipet will
be held in place by the white rubber collar, such that you will now operate
the pump, with pipet attached, with
one hand. Your other hand must be free to manipulate test tubes
and bottles.
e. You will use the pump's thumbwheel to draw liquid into the pipet
and to expel the liquid.
Problem?Pipet falls
out of pump? That means the glass is not snug against the rubber
collar. Moisten the outer surface of the blunt pipet
end with a tiny drop of water and try the insertion again.
Problem? Liquid dribbles out of pipet
tip (the tapered end) when you try to use it? That means the glass
is not snug against the rubber collar. Moisten the outer surface
of the pipet end with a tiny drop of water
to get a better seal and reinsert the pipet.
Still having trouble? Ask TA for help.
5. You see there are 5 solutions (listed above, Materials) to be dispensed with the pipets. Use a different pipet for each solution. Don't mix them up; that would contaminate the solutions in the bottles and might foul your data. Remember which pipet goes with which solution; you may have to repeat something. When reading a pipet, always align the bottom of the meniscus at the mark you want; the meniscus is the curved top surface of the liquid as it sits in the pipet.
6. One of you (you or your partner) should pipet the albumin stock solution and the KCl solution (potassium chloride); the other person should pipet the rest of the solutions. Every person must begin to learn how to use pipets to measure solutions accurately and cleanly; that takes practice.
7. As a matter of routine lab procedure, treat all chemicals and solutions as potentially harmful. Most are not, but you must always be on guard against the chance of accidental injury. So, when you pipet, pour, or in any other way transfer substances from one place to another or from one container to another, watch for drips and spills and minimize that. In today's work, the blue biuret reagent contains a caustic base (alkali, NaOH), so it must be handled with particular care. You will learn more about bases and acids in your chemistry coursework.
PREPARATION OF THE SOLUTIONS IN TEST TUBES:
1. Set up and number the 8 large test tubes in the rack: #1-#8, left to right.
2. Refer to the Experimental Setup Table for the volumes of the 5 solutions to be dispensed (pipetted) into the 8 test tubes. Note that different tubes receive different volumes of the solutions.
3. Pipet the solutions into the test tubes as follows:
a. As you pipet the various solutions into each test tube, CAREFULLY swirl each tube to ensure that the materials are uniformly mixed in the tube. The color-producing reaction of the reagents with the albumin protein won't occur properly unless the solutions in the test tubes are thoroughly mixed. Do not invert the test tubes; just carefully swirl each one to mix the contents.
b. First dispense the albumin stock solution into all tubes that are supposed to get it. (Note that #1, #7, & #8 don't get this solution.)
c. Second, dispense the two albumin "unknown" solutions into the two tubes that are supposed to get those.
d. Next, dispense the 0.5 M KCl solution into all tubes that are supposed to get it. Since the albumin itself was prepared in 0.5 M KCl solution, this addition of KCl is meant to keep the total volume the same in each of the tubes #2-#6 (5 mL for the sum of the first 2 columns in the setup table).
e. Finally, add the biuret reagent to the tubes. The NaOH (sodium hydroxide) in this is caustic and poisonous and can burn the skin and eyes. HANDLE IT CAREFULLY. If you do get a drop on your gloves, rinse them with running water immediately and change gloves.
f. Let tubes stand undisturbed 20 minutes for full color development. Once formed the color will be stable for the rest of the lab period.
STANDARDIZATION OF THE SPECTRONIC 20 COLORIMETER .
While you wait for color development in the tubes, standardize the instrument as follows. This is much the same as you did last week except that you'll use only one wavelength today.
1. Turn the power switch (front left) clockwise to turn on the instrument; you'll hear/feel the on-click. The pilot lamp should glow, and you may hear the gentle sound of the cooling fan inside. If the pilot lamp doesn't glow on one of these instruments, don't be concerned. The instrument should warm up for at least 15 minutes.
2. Use the wavelength control knob (on top) to select the desired wavelength; the wavelength values shown in the wavelength dial display window are graduated in nanometers (nm). Never assume that it has already been done; check it! The purple colored product that forms when proteins react with the biuret reagent absorbs light of 540 nm wavelength most strongly; so that is the wavelength used in the biuret test. [A thought connection: if you were going to measure concentrations of riboflavin in solutions, what wavelength would you use? You worked with riboflavin last week.]
3. With the sample holder (chamber )empty and its lid closed, use the "0" control knob (same as the power switch, left front) to set the indicator needle to zero percent on the transmittance scale, 0 %T. Without a tube in the chamber, no light enters the chamber (it's pitch black in there), so no light would strike the detector tube beside the sample chamber (inside the instrument housing, not visible to you). In effect, you're telling the instrument that if there were a tube with a solution in the chamber, this is what you'd see if absolutely none of the light entering the tube passed through to the other side, i.e. 0 % of the light got through.
4. After the 15 minute warm-up pour the solution from the #1 big test tube (the blank) into the small colorimeter tube. Check for drips; wipe clean/dry if necessary. Carefully insert the colorimeter tube into the sample holder, with the tube label facing to the front,and close the lid. The needle will sweep upward upward on the %T scale. Wherever the needle stops, use the light control knob (right front) to move the needle to 100 %T on the scale (= 0 absorbance). Think about what this means:
**** At this moment 540 nm light is passing through the solution and the amount that strikes the detector is registering on the scale you see. Some of the light is absorbed by the glass, the water, and the solutes (KCl & the blue biuret reagent) in the solution. Since you will want to measure light absorption by the purple colored protein product, you must correct for the light absorption by these other things. This amount of light absorption would be the same in all of your tubes since they will all have the same solvent and the same solutes except for the added protein (albumin). Therefore, this 100 %T setting represents a baseline of light transmitted equally through all the solutions unless something else is in any solution to absorb more light. That "something else", of course, is the colored complex of biuret reagent and albumin which is present in different concentrations in all of your solutions except #1. That is what you're interested in, the color development (and light absorption) that is due to the protein. So, this "standardization" of the instrument in a sense corrects for all light absorption that is due to factors other than the one of interest. Note that the blank solution today is more than just water; in last week's exercise, the blank was only water. The composition of the blank solution depends upon what solute is being meaured; different color reagents and solvents are needed to produce colored products with different types of solutes of interest: proteins, fats, sugars, etc. ****
5. Remove the blank tube from the sample chamber and close the lid; the needle should fall back to zero %T. Pour the blank solution back into test tube #1, in case you need it again (You may!).
6. The instrument is now standardized for 540 nm wavelength. You DO NOT CHANGE the light control knob or the "0" control knob hereafter. Again, once the instrument is standardized, you don't use those two knobs on the front of the instrument, since you are working with only one wavelength here.
In the data table note the values for tube #1 (the blank) in columns 8 and 9 (A = 0 and %T = 100). Since this blank solution contains no albumin, there is no purple; the blue that you see is due to the biuret reagent, which is present in all of the tubes. Your standardization step is telling the instrument to ignore that blue.
7. Use the squeeze water bottle and 1-quart RINSE cup to carefully rinse the just-emptied colorimeter tube with water, drain briefly, and dry the outer surface. You will use the colorimeter tube to take readings for each protein solution now as follows. [ Note: You don't need to dry the tube interior. Ideally you'd want the inside dry too, but the tiny volume of the water film inside the tube is very small compared to the 8 mL of solution that you will pour into the tube next. This tiny source of error will be the same for all of your tubes. So, you don't need to dry the inside.]

COLLECTION OF DATA FROM PROTEIN SOLUTIONS (#2-#8):
After you have standardized the instrument, measure absorbance and percent transmittance of each solution (#2-#8) and record those data in the last two columns of your Experimental Setup Table. Proceed carefully as follows; remember to watch for drips; the solutions in your test tubes all contain caustic NaOH.
1. Pour test solution (sample) #2 into the colorimeter tube. Wipe the surface dry/clean.
2. Insert the colorimeter tube into the sample holder (tube label facing front); close the lid. (Don't turn any knobs.)
3. Read and record the absorbance value and the %T value in the data table, columns 8 and 9. (Don't turn any knobs.)
4. Remove the tube from the sample chamber and carefully pour the solution back into its original test tube. You may need to take readings for that sample again, so save it. (Don't turn any of the colorimeter knobs.)
5. Use the squeeze water bottle and 1-quart RINSE cup to carefully rinse the colorimeter tube with water, drain it briefly,wipe the surface dry/clean. Using this RINSE cup and squeeze water bottle will save come time going back and forth to the sink. At the end you can empty the RINSE cup at the sink.
6. Repeat steps 1 - 5 for sample #3, and so on.
CALCULATIONS AND DATA PLOTTING:
The ultimate purpose of the biuret test is to determine the concentration of protein in solutions. In order to do that, you must first construct from your data a standard curve, which provides a reference, or baseline, that you can compare unknown solutions against. Do this as follows.
1. You were given a bottle of albumin solution of known concentration (2.5 mg/mL), and you pipetted different volumes of that stock solution into tubes #2-#6 (column 2 in the data table). Since the total (final) volume of solution in every test tube was 8 mL, you can calculate the albumin concentration in each of the tubes #2-#6 and enter those values in column 7 in the data table. This has been done already for tube #2. Do the calculation for #3-#6 and enter the values in the table. Use the dimensional analysis technique taught in the first lab session; pay attention to the units. Note that 4 decimal places are shown for tube #2 only so that you can check your calculations. Our measurements are not accurate to 4 decimal places. Round these concentration values to 2 decimal places for plotting. The rule for rounding was in last week's lab material.
2. Set up X-Y axes on graph paper and plot absorbance (data table column 8) on the Y-axis versus albumin concentration (data table column 7) on the X-axis for tubes #2-#6. These solutions are "knowns;" i.e. you know the albumin concentration of these five. So you will use these five to construct your standard curve.
a. Tube #1 data are not part of the standard curve. Tube #1 is the blank, used to standardize the colorimeter. Though you might expect the standard curve to go through the origin (0,0) of your graph, it may not do so. The Beer-Lambert Law does not say that the linear relationship between absorbance and concentration extends across all concentrations. So, the concentration range in which the law applies may not include 0,0 on the graph.
b. Tube #7 and #8 data are not part of the standard curve. You will use the standard curve to determine their concentrations.
c. Recall the information about plotting data in the guidesheet, Construction of Graphs, from the first lab session. Label axes properly, plot points accurately, etc. Sloppiness and carelessness about this will cost points later. In particular, do not label the major divisions on your x-axis with the 4-decimal-place values taken straight from column 7 in the data table, because that would make interpolation between those values very awkward later when you determine the two unknowns.
3. Your set of 5 points on the graph should appear to fall approximately on a straight line. Use a ruler to draw the "best fit straight line" through this set of points. Do not draw dot-to-dot. The line probably won't go through some points. The sum of distances of points to one side of the line should be the same as the sum of distances of the points on the other side of the line. Do not change your data or move the points to get them to come closer to being a straight line. As mentioned earlier, the 5 points should be in a straight line, but the various kinds of error that occur in doing the work will cause some points to be less accurate than others (see Sources of Error, below). *Remember hereafter that fabricating data or manipulating data to suit one's biases are inexcusable acts in science. Never invent the data; never fudge the data.*
This straight line illustrates the Beer-Lambert relationship that was described earlier. This straight line is what is known as the STANDARD CURVE in a colorimetric test procedure.
4. You can now use this standard curve to estimate the concentration of protein in solutions that contain unknown amounts of protein. This is the purpose of constructing a standard curve. *** It's important to consider again for a moment that the "unknown" protein solutions might come from blood samples or urine samples or many other sources that are important for medical or other reasons. So, what you are trying to learn about here is more than an academic exercise.***
5. You have an absorbance value for each of the two unknowns (tube #7, #8). For each unknown, find the point on your standard curve where the recorded absorbance value falls. Then drop a line to the X-axis to find the concentration value that corresponds to that absorbance value. Note that this concentration value has the units, mg/mL; it is not just a number. Record that concentration value, from the standard curve, in column 7(see the asterisk?), for each unknown.
Obviously this concentration value is only as accurate as the standard curve is. So, it is essential that errors be minimized during the procedure in order to obtain absorbance data that are as accurate as possible. Always be watchful for sources of error and minimize them.
6. One last step... This concentration value that you have now for each unknown solution requires one additional calculation. The concentration value taken from your standard curve represents the albumin concentration of the solution that you put into the colorimeter; that's obvious. But that concentration value for each unknown solution is not the concentration of albumin that you started with in the bottle. You need to know the concentration of albumin in the original solution in the bottle before you added the 3 mL of the blue reagent. This requires solving a simple dilution problem, which involves dimensional analysis again. Watch the units; they must work out correctly.
The final answer (albumin concentration in the bottle) must have mg/mL units. The volume of solution in the colorimeter tube that you read was 8 mL. But that 8 mL contained only 5 mL of the unknown protein solution; look at the setup table again. The other 3 mL was biuret reagent. Therefore, the albumin concentration in the 8 mL in the tube is not the same as the albumin concentration in the bottle before you added 3 ml of biuret reagent to 5 ml of the unknown albumin solution. Think about how to solve that. [Hint: clearly the answer (the concentration in the bottle) must be somewhat greater than the concentration in the tube (the value that you got from the standard curve), since you diluted the original albumin solution when you added the biuret reagent. So, your calculation needs to "undilute" the original 5 mL that you took from the bottle.]
Check your results with the lab instructor before you leave.
BEFORE YOU LEAVE LAB TODAY:
1. Put your used pipets into the tall
white, marked cylinder near the sink.
2. Cap all the bottles (biuret, albumin,
etc.).
3. Disposal of test tube solutions. After you have
collected your data, pour your test tube solutions into the 1-gallon bottle,
marked WASTE.
4. Wash and rinse all of your tubes and the 1-quart RINSE cup thoroughly.
Put the tubes upside down in the rack to drain/dry.
5. Check to be sure you haven't left a tube in the sample chamber.
6. Clean your work area.
7. Wash your hands, even though you wore gloves.
8. Turn off the colorimeter.
SOURCES OF ERROR:
Error was mentioned above when you were considering why your five plotted data points did not fall exactly on a straight line, even though they should have, theoretically. Error is always present to some degree when experimental procedures are being done and when measurements are being made. Always remain alert to potential sources of error in your work and do what you can to minimize error. The reliability of your results depends heavily on this.
Do you assume that the clocks you use keep time accurately? If you ever got stopped for speeding, did you assume that the radar device was accurate? When you fill up your car's gas tank, do you assume that the pump delivers those gallons accurately? When you have medical tests done, do you assume that the lab results are accurate? Incidentally, some of those medical tests are colorimetric tests, like the one you just did, with results based on standard curves.
So, what are the sources of error in today's work, the reasons that your points weren't exactly linear? Here are some possibilities, the kinds of things to keep in mind when you do such lab work.
*How carefully did you do the pipeting?
any
error there?
*Did you take care to be sure that each solution in its test tube was
thoroughly mixed? You wouldn't get proper color development if the solutions
weren't thoroughly mixed.
*Were you and your partner equally careful? Maybe the problem is traceable
to one factor in the procedure and you notice that your partner did that
particular step.
*Did you standardize the colorimeter properly?
*Did you rinse the colorimeter tube thoroughly between samples?
*When you read the colorimeter scales, did you sit directly in front
of it always?
*If a plotted point seemed "way off," did you recheck the calculations? and
the accuracy of your plot? and the proper
setup of scale divisions on your graph?