ELECTROPHORESIS
In the pharmaceutical production of medicines, the desired product must be separated from other chemicals in the reaction mixtures. Whole blood can be used for several purposes if its components are first separated: platelets from other cells, or blood cells from the plasma, or clotting factor from other blood proteins, for example. In biology, chemistry, medicine, and manufacturing applications it is often essential that some things be separated from others. In other lab sessions you have seen or will see that centrifugation, dialysis, and chromatography are types of separation techniques. In this exercise you will see another separation technique - electrophoresis.
Electrophoresis separates molecules from one another on the basis of molecular charge. It has proved to be extremely useful for separating different proteins from one another or nucleic acids from one another. These important macromolecules possess charged functional groups which give the whole molecule a net charge. If a protein or nucleic acid molecule, in solution, is placed between a positive electrode (anode) and a negative electrode (cathode), then the molecule will migrate toward the oppositely charged electrode when current is applied: a positively charged molecule toward the cathode and a negatively charged molecule toward the anode. The rate of migration depends on several factors, including the magnitude of molecular charge. If two proteins have a positive charge, then the one that is more positive will migrate faster toward the cathode. Thus, even if the sign of the charge on two molecules is the same, they may still be separated from each other.
Before proceeding you will need to print
these two links for reference in the lab session:
Figures 1-4.
Figures 5-8.
BACKGROUND ON MOLECULAR CHARGE OF PROTEINS
Your lecture notes and related text material contain the information you need about protein structure to understand why protein molecules are charged. The general structure of amino acids shows that each of the 20 commonly occurring ones has two reversibly dissociable functional groups attached to a central carbon atom: an amino group and a carboxyl group. The "R" represents the side chain. (see Figure 1)
Because these reversibly dissociable functional groups accept or lose protons depending on the H+ concentration (i.e. the pH) of the solution in which the molecule is dissolved, the amino group may be positively charged or uncharged and the carboxyl group may be negatively charged or uncharged. Therefore, a single amino acid molecule has functional groups each of which may be charged, and the molecule as a whole may be charged or uncharged. This property of the whole molecule is called "net charge." Net charge is simply the sum of all separate, individual charges on the functional groups.
Up to this point the amino acid considered is a generalized one, since the side chain has not been specified. As shown on the last page here, it is the side chain that makes each amino acid different from the others. The side chain contains functional groups (methyl, hydroxyl, phenyl, etc.). In some amino acids there is an amino group or a carboxyl group in the side chain in addition to the amino and carboxyl groups that all amino acids have. For example, lysine and arginine have an amino group in the side chain; aspartic acid and glutamic acid have a carboxyl group in the side chain. These reversibly dissociable functional groups also are charged or uncharged depending on the pH of the solution. (see Figure 2, 3)
In linking amino acids together by
peptide bonds to form a polypeptide, it is the amino group and the carboxyl
group attached to the central carbon atom in each amino acid that participate
in dehydration synthesis. Therefore, those two functional groups of each
amino acid in the polypeptide are not reversibly dissociable and do not
bear charges in the polypeptide chain, as shown in the peptide of Figure 4. Those amino and carboxyl groups do not
contribute to the net charge of a protein.
However, you can see that amino and carboxyl groups in side chains do remain free and therefore reversibly dissociable; those can still contribute to the charged nature of the polypeptide. The pKa values for these are 3.65 (aspartic acid carboxyl group), 4.25 (glutamic acid carboxyl group), 10.5 (lysine amino group), and 12.5 (arginine amino group). Therefore, at pH values near neutrality, these carboxyl groups are negative and these amino groups are positive. Some of them will end up at the folded protein's surface in contact with the surrounding water. Some of them will interact with each other (charge-charge attractions and repulsions). These factors contribute to a protein’s 3-dimensional structure. These charged groups, when all added up, give the protein its net charge value. Depending on the relative numbers of positively and negatively charged groups, a protein molecule may be weakly or strongly charged or even uncharged, i.e. electrically neutral.
THE ELECTROPHORESIS GEL
Consider the jiggly, semisolid dessert food called gelatin. When powdered gelatin is dissolved in boiling water and then cooled, the solution changes from a liquid state to a gel state. In electrophoresis a polysaccharide called agarose is used to form a gel in the same way. As cooling occurs, the long polysaccharide molecules in solution cross link with each other to form a dense mesh, or network, that holds water like a sponge. [Future connection: in other courses you may use a substance called acrylamide to form gels.]
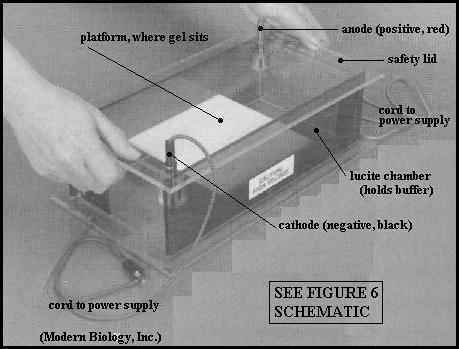
Picture a thin (a few mm) rectangular slab of such a gel (see Figure 5). Small rectangular wells can be made in the slab gel, and protein solutions can be placed in the wells. The slab gel is then immersed in a buffer solution, within a holding tank (see Figure 6). Electrodes are positioned at opposite ends of the tank, and a current is passed through the gel. Proteins will migrate, according to their net charges, as bands, away from the starting point (the well), through the gel toward one electrode or the other. The proteins move through the water spaces within the gel slab in response to the electrical current. The length of time that current is applied (development time, "run" time) depends on several factors. A run time of 30 to 45 minutes in your exercise will show you the principles of electrophoresis in action.
As already noted, a protein molecule's net charge depends on its charged functional groups, and those groups are charged or not depending on the pH of the solution. So a protein molecule's net charge can be changed by adjusting the pH of the surrounding solution. The pH at which a protein's net charge is zero is called the isoelectric point of that protein. At that pH the protein would not move away from the well toward either electrode. At any solution pH value above or below the isoelectric point, the protein will migrate away from the well because the protein is charged. By choosing a particular pH value for the buffer solution, the protein of interest can be made to migrate faster or slower. Different proteins will migrate through the gel spaces at different rates because their net charges are different.
VISUALIZATION OF THE SEPARATED PROTEINS
Since most proteins are colorless in the natural state, they cannot be seen within the gel unless some sort of stain/dye is applied to locate them. Soaking the gel, after the electrophoretic run, in a solution of Coomassie blue stain, for example, will make the proteins appear as blue bands within the gel. Unfortunately, this takes more time than you have for this exercise. Therefore, you will perform electrophoresis using proteins which are themselves pigmented; thus you will be able to see them as they migrate through the gel. Cytochrome c, hemoglobin, and myoglobin have color as a result of the iron within each molecule. The serum albumin that is used here has been pretreated with a blue dye to make it visible.
Cytochrome c is one of the electron transport proteins in mitochondria. Hemoglobin is the O2-carrying protein of erythrocytes. Myoglobin, which is similar to hemoglobin, binds O2 in muscle cells. Serum albumin is a type of protein commonly found in blood; it binds and transports fatty acids in the bloodstream.
The pH of the electrophoresis buffer used today is 8.5. The isoelectric
points of the four proteins are: hemoglobin (6.8), myoglobin (7.2), albumin
(4.8), cytochrome c (10.2). Based on this information, at pH 8.5
cytochrome c will be positively charged (and will migrate toward the cathode)
and the other three will be negatively charged (and migrate toward the anode).
Moreover, the three that are negatively charged will migrate at different
rates: albumin fastest and myoglobin slowest.
Think carefully about these facts to be sure you understand them: why a protein moves in one direction at a particular
pH and faster or slower as a function of pH.
____________________________________________________________________________
THE PROCEDURE
***About safety***
(1) WEAR GLOVES AND EYE PROTECTION.
(2) You will use a hot plate to heat water in a beaker; this boiling water bath is needed to dissolve the agarose. Work with these carefully.
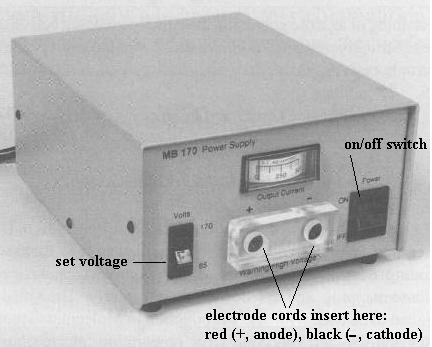
(3) Follow the TA's instructions about using the electrophoresis power supply. (see photo link) Make sure the power supply is unplugged and switched to OFF right now. This unit produces the current that passes through the buffer solution. The electrophoresis chamber is designed so that the current can flow through the solution only when the chamber lid is in place. And when the lid is in place it is impossible to touch the solution in the chamber. This design feature prevents accidental electrical shock. Whatever electrophoresis apparatus you may use in future, never touch an electrophoresis solution while current is passing through it! Turn the power supply on and off as instructed below in the procedure.
A. Summary of steps. Think of the procedure as having the following steps, in this order.
1. Preparation of the agarose gel. You will work with a lab partner to prepare a slab gel.
2. Putting the protein samples into the wells in the prepared gel. You will use a micropipette with plunger.
3. Placement of the gel into the electrophoresis chamber and filling the chamber with buffer solution. You and another student team will share a chamber.
4. Closing the chamber (putting the lid in place) and turning on the power supply to perform the run
5. Ending the run by turning off (and unplugging) the power supply, removing the chamber lid, and removing the gel from the chamber
B. Materials. Before you begin, locate these materials on the bench.
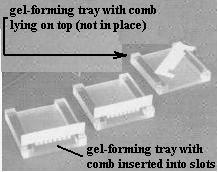
* a lucite gel-forming tray (see Figure
7)
* a 2 inch X 3 inch glass slide
* a roll of masking tape
* a white plastic "comb", for forming the wells (see Figure 7)
* a hot plate beaker-water bath. There are two of these, on
separate benches. The TA has a third.
* a small bottle of electrophoresis buffer (pH 8.5)
* a 25 ml graduated cylinder
* a test tube rack and a test tube clamp (holder)
* a micropipette (with white markings at 5, 10, 15, 20, 25
microliters) and one micropipette plunger (see Figure 8)
* a small beaker of water for rinsing the micropipette between
samples
* a 1 mL pipette, to be used as a stir
rod
* a large test tube containing 0.18 g of dry powdered agarose
(white)
* a box of kimwipes
* a power supply (see photo link) and
electrophoresis chamber (see photo link)
* a set of 4 small plastic snap-top sample tubes, each containing
a different protein solution, in a small green tube rack. There are four of these green racks in the
lab.
C. Preparation of the gel. Follow your instructor to prepare the gel.
Bring the water bath to a boil; keep it at a moderate boil through step 5.
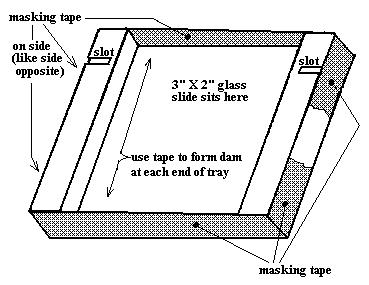
1. Get a piece of masking tape about 4 inches long. Stretch it across one open end of the gel forming tray, with the top edge of the tape even with the top edge of the tray. (see illustration link) Then smoothly and firmly fold the tape around the sides of the tray and under the tray to form a one-piece tight seal. You are forming a dam to close that end of the tray.
2. Carefully lay the 2" X 3" glass slide snugly into the tray and then repeat the above step with another piece of tape to seal (dam up) the other end of the plastic tray.
3. Lay the gel forming tray on the bench and practice carefully inserting (and gently pushing down) the white well-forming comb into the slots cut in the side of the tray (with the "teeth" pointing down). (see photo link) In a few minutes you will need to do this with the tray full of molten agarose solution. Practice now to do it smoothly and carefully later.
4. Use the graduated cylinder to measure 15 ml of electrophoresis buffer into the test tube containing agarose. Swirl it to suspend the powder; then set the tube into the boiling water bath. Wait 5 minutes; the suspension will become crystal clear as the agarose dissolves.
5. After 5 minutes, use the test tube clamp to move the tube from the bath to your test tube rack for 3 minutes. Use the 1 mL pipette to carefully stir the agarose solution in the test tube. The agarose solution must be thoroughly, uniformly mixed in the tube.
6. After 3 minutes in the test tube rack, carefully pour the agarose solution into the gel forming tray to cover the glass slide in the tray.
7. Carefully insert the white comb into the side slots of the tray, pressing down to seat the comb securely. The "teeth" will be immersed in the molten agarose, with their ends just above the glass slide. Wait 20 minutes for the gel to solidify.
It's normal for some of the molten agarose solution to creep beneath the glass slide. But, if you see an air bubble form on top of the agarose, carefully burst it with the tip of the metal pipette plunger, as soon as possible.
8. While waiting for the gel to solidify, practice using the micropipette
and plunger. (see Figure 8) Insert the plunger
into the pipette. To operate with one hand:
a. Grasp the top end of the pipette
between thumb and middle finger.
b. Put the tip of your index finger
through the plunger's top loop.
c. Put the tip of the pipette (the
end away from your fingers) into the water in the small beaker.
d. Raise the plunger to draw water
up to the second mark (10 uL).
e. Use a kimwipe to carefully wipe
the pipette side near the delivery tip to remove adhering water.
f. At this point you would expel the
fluid in the pipette by pushing the plunger. If this were a protein sample, you
would carefully expel the fluid into a well in the gel. For now, just
expel the water back into the beaker.
g. If this were a protein
sample you had just transferred, you would now rinse the pipette with water
4 times by drawing water (from the beaker) into the pipette (up
to at least the 4th mark) before you used the pipette to transfer the next
protein sample. This rinsing is necessary to prevent carryover contamination
of the 2nd, 3rd, and 4th protein samples.
9. When the gel is solid (it will have an opalescent, "smoky" appearance), carefully remove the tape from both ends of the gel forming tray (to avoid damaging the gel), and carefully remove the comb (pull slowly and evenly straight up).
D. Applying the samples and "running" the gel
1. Lay down the tray on the bench. Place it so that the end of the gel nearest the 8 wells is away from you. With the tray positioned this way, the wells are numbered 1 - 8 from left to right.
2. Get one of the sets of 4 protein samples (small green tube rack). Note that these plastic sample tubes are designed for use in a microcentrifuge; you saw an example of this in the second enzyme lab.
3. Using the procedure you practiced earlier, use the micropipette and plunger to transfer 10 μL (the second white mark from the delivery tip of the micropipette) of each protein sample to the wells in the gel as follows (each protein in a different well). Be sure to rinse the micropipette at least 4 times with water after each protein sample.
well #1 - cytochrome c; well #3 - myoglobin; well #5 - hemoglobin; well #7 - serum albumin
4. Take your loaded gel tray to the TA to get the wells sealed with agarose. He/she will explain. Be careful not to tilt the tray; the glass slide and gel may slip out.
5. When you (and your partner) and the other team on your side of the bench have reached this point, you are ready to put the gels trays into the chamber.
6. Make sure the unplugged power supply is switched to OFF. (see photo link) Make sure the power supply's toggle switch (left side) is in the 170 volt position. Note that the red and black electrode cords run from the electrode connectors on the top of the electrophoresis chamber lid. The ends of these cords will plug into power supply (not yet). The electrodes themselves are the long thin wires down in the sides of the electrophoresis chamber. NEVER TOUCH THE EXPOSED WIRES.
7. Carefully place your gel tray onto the white table-like platform inside the chamber. Point the end of the gel that is closest to the wells toward the cathode (black electrode). When both teams have done this, the instructor will assist in placing the U-shaped stabilizer bar on top of the gel trays.
8. With the trays in position in the chamber, carefully (to avoid moving the gel trays) pour about 2.5 liters of electrophoresis buffer into the chamber such that the buffer level rises slowly up over the top of the gels and gel trays to cover them completely to a depth of a few millimeters. The buffer pH is 8.5.
9. Carefully set the chamber lid in place, with the cords and electrodes matching up (red to red and black to black).
10. Insert the electrode cords into the front of the power supply: red-to-red and black-to-black. (see photo link) Then plug the power supply into the electrical outlet on the bench and turn the power switch to "ON".
HEREAFTER, DO NOT LIFT THE LID OF THE CHAMBER WHILE THE POWER IS "ON". The inside of the lid will fog up as the current heats the buffer inside; this fogging is normal. Leave the chamber closed and watch. Note the start time.
11. After 5 minutes, turn off the power switch and lift the lid of the chamber so that you can see the gel clearly. Note that lifting the lid prevents electrical current from reaching the electrodes in the chamber. (Don't reach into the chamber; just observe.) Note the direction of movement of the cytochrome c (well #1) versus the direction of movement of serum albumin (well #7).
12. After this observation at 5 minutes, put the lid of the chamber back in place securely (red-to-red and black-to-black). Turn the power switch to "ON" and let the run proceed for another 25 minutes.
13. After a total run time of 30 minutes, turn off the power supply and unplug it from the the electrical outlet on the bench. Carefully remove the chamber lid and wipe off the moisture on the lid inner surface. Set the lid aside.
E. Thoughts and questions
Observe the positions of the colored protein bands in the gel. Where is the cytochrome c band? Which protein moved farthest from the well toward the anode? Why? If all 4 proteins had been in the same well, would they now be completely resolved? Resolution refers to the extent to which the protein bands are completely separated or not. If bands are separated such that there is no overlap of one band by another, then they are completely resolved. Would resolution be improved if the run time were longer? That's the point of the technique: to separate the charged molecules from one another.
Can you explain what you have seen in this exercise? Would the results you have seen be different if the pH of the electrophoresis buffer had been 5.5? 10.5? What's the relationship between proteins' net charge and distance migrated through the gel?
F. Now that you're done...
At this point:
(1) leave the chamber and gel trays within the chamber as
is.
(2) put the test tube that contained the agarose in the water
bath. The lab instructor will collect these later.
(3) Discard the used micropipette in the BROKEN GLASS trash
box. Rinse the plunger with water and wipe dry with a kimwipe.
Leave the plunger by the test tube rack.
(4) Rinse the graduated cylinder thoroughly.
(5) Rinse the gel forming comb, dry it and leave it by the
test tube rack.
Clean and tidy your work area.
Wash your hands as soon as possible.
References: The equipment used in this exercise and the protein samples are
from Modern Biology, Inc.,
Robyt, J. F. and B. J. White. 1987. BiochemicalTechniques:
Theory and Practice, Brooks/Cole Publishing Co.,
